 Motion Tasks
Overview
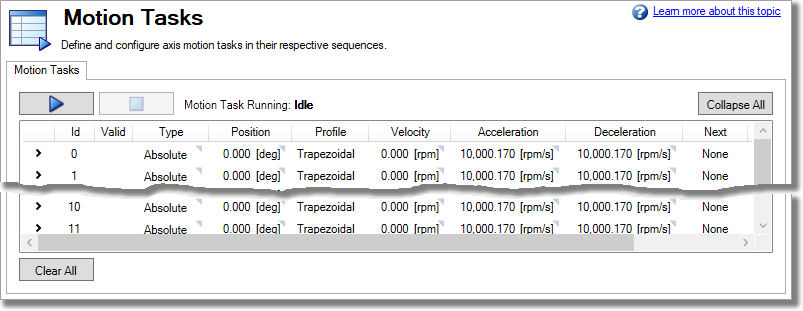
The AKD2G offers several options for executing moves, which are called "motion tasks" in WorkBench. You can directly link an input to a single motion task, command over the Ethernet connection, or automatically execute a motion task as the result of the completion of another move event. Using the Motion Task view, you can also set up a single motion task or a sequence of motion tasks through the Motion Task screen. The Motion Task view allows you to modify a variety of parameters for a given move, including move profile, move type, velocity, distance, and acceleration limits.
Motion Task Input Table
Motion tasks can be easily entered and manipulated using the Motion Task Table. With this table, you can enter specific motion tasks and edit tasks, as well as insert and delete tasks. The data table you build remains in WorkBench until you load the tasks into the drive (DRV.NVSAVE ). Once the tasks are loaded, you have access to the graphical representation of the moves.

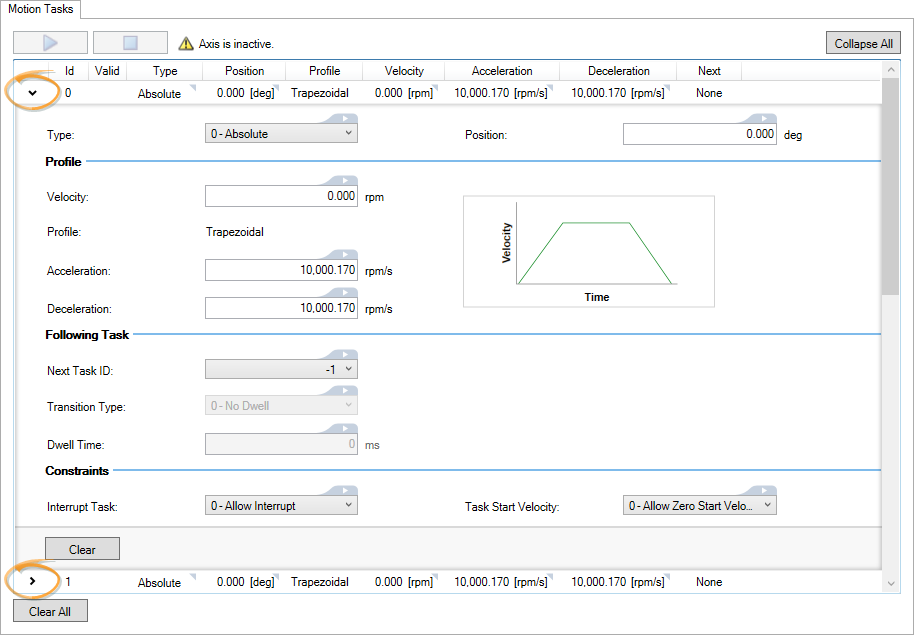
To configure a motion task, expand one using the arrow and enter the parameters. The Clear button will reset the current motion task and the Clear All button resets all motion tasks.

Contextual Menu
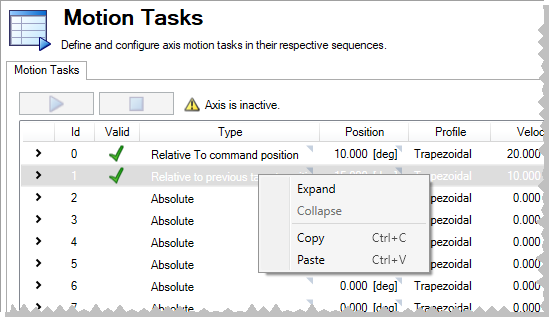
Right-clicking on an entry provides a menu which will let you Expand/Collapse or Copy/Paste the selected action. Copying a task lets you easily duplicate an action you have configured. All of the information will be duplicated.

-
- Registration tasks with a Capture Channel are not supported by the Copy/Paste feature.
Configuring Motion Tasks
Motion Tasks can be as simple as moving from point A to point B, or as complex as being chained together with delays and blending.
Use the following options to configure each motion task as desired.
| Element | Property | Description | Parameter |
|---|---|---|---|
| Type |
Select whether the move will be Absolute or Relative to a position.
See Motion Task Move Types for details on each type. |
AXIS#.MT.TYPE | |
| Position | This is the target position, based on the type of move selected. | AXIS#.MT.P | |
| Profile | Velocity | Sets the peak or traverse velocity depending on the move parameters. | AXIS#.MT.V |
| Profile | Trapezoidal is the only profile currently available. | ||
| Following Task | Next Task ID | By default, this is -1, which indicates that there is no following motion task. Setting this to any other value will attempt to execute that motion task as soon as this one is complete. | AXIS#.MT.MTNEXT |
| Transition Type |
This selection allows for different start conditions to initiate the following task. By default there is no delay, but using the dwell you can specify time, or if you do not want the axis to stop moving as it transitions to the next motion task, you can choose where the blend occurs by using Type 2 or 3.
See Motion Task Transition Types for details on each type.
|
AXIS#.MT.TRANSITION | |
| Dwell Time | Only valid when Transition Type is set to 1 (Dwell), this specifies how long the axis should remain at rest until executing the following motion task. | AXIS#.MT.TNEXT | |
| Constraints | Interrupt Task |
Interruptible (set value to 0):
Non-Interruptible (set value to 1):
|
AXIS#.MT.DISALLOWINTERRUPT |
| Task Start Velocity |
Allow Zero Start Velocity (set value to 0):
Don’t allow Zero Start Velocity (set value to 1):
|
AXIS#.MT.DISALLOWZEROSTARTVEL | |
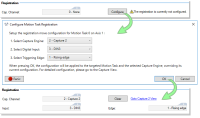
| Registration | This section is visible when motion task type 3 is selected. See Registration (relative to external position) for more information. | ||
| Capture Channel |
Specifies the capture channel used for the registration move for the specified motion task. The default value 0 prevents the motion task from being used as a registration move. Each non-zero value may be used for at most one motion task on the same axis.
|
AXIS#.MT.CAP | |
| Input | Selects the digital input trigger source for the capture channel and corresponding registration move. | CAP#.TRIGGER | |
| Edge |
Selects the trigger edge for the capture channel and corresponding registration move.
|
CAP#.EDGE | |
| Buttons | Clear | The Clear button appears once inside the motion task once it has been defined. Clicking this button will reset the motion task. | |
| Clear All | The Clear All button appears at the bottom of the Motion Tasks view. Clicking it will reset all of the motion tasks. | ||
Motion Task Move Types
Absolute Moves will use your Home as it’s reference, and the Target Position will be absolute to that home reference. Relative Moves will use a previous target position and make an incremental move from the designated previous target.
| Value | Motion Task Type |
|---|---|
| 0 | Absolute |
| 1 | Relative to command position |
| 2 | Relative to previous target position |
| 3 | Registration (relative to external position) |
| 4 | Relative to feedback position |
-
- This keyword is not saved, it modifies the bitfield AXIS#.MT.CNTL, which is saved to NV memory
An absolute move type will move to the actual position indicated by AXIS#.MT.TYPE. A home move would have been established to provide the reference for actual positions on the machine. In this case, the target position = AXIS#.PL.CMD = AXIS#.MT.P
Example:
You want to move to a position that is 68 degrees from home reference.
From the Motion Task edit page, select the Absolute move type, and then enter 68 into the position block (units should be set in degrees). Enter the traverse speed and adjust the acceleration and deceleration parameters as needed. Exit the edit screen, select this task, and initiate a start. Regardless of your current position, the motor will now rotate to the absolute position of 68 degrees as referenced from the home position.
-
- If Modulo is enabled (AXIS#.PL.MODPEN = 1), then the value of AXIS#.PL.MODPDIR will affect the direction of Absolute Motion Tasks.
This type is simply an incremental move. The target position is based on the current position represented by AXIS#.PL.CMD plus the increment you want to move. Specifically, Target Position = AXIS#.PL.CMD + AXIS#.MT.P
Example:
Your current motor position at the time you activate the motion task is 38 degrees. You want to move an increment of 30 degrees.
From the Motion Task edit page, select the Relative to Command Position move type, and then enter 30 into the position block (units should be set in degrees). Enter the traverse speed and adjust the acceleration and deceleration parameters as needed. Exit the edit screen, select this task, and initiate a start.The motor will move 30 degrees form the current position. After the motion task, the motor will now be at 68 degrees (38 + 30 = 68).
Using the last target position as the start point, this profile will move the increment chosen from the last position. This motion type is recommended in situations where a previous task may have been interrupted, or you want to eliminate any accumulated error. The target position will look at the previous target position and then add the increment you enter for this task. Specifically, Target Position = Previous Target Position + AXIS#.MT.P
Example:
You initiated a motion task to increment 360 degrees, but that task was interrupted and the motor was stopped at 175 degrees. You use this method and increment another 360 degrees, the motor will complete the motion at 720 degrees (basically, it finished the first move to 360, and then made the additional distance requested of 360 degrees).
The task would be set up similar to the Relative command position example above. To view this in action, set up 2 tasks, first Relative to command position and the second, Relative to previous target position. Use low velocities so you can stop motion before the move is completed. Start the first move and then stop before it finishes. Then select the second move. The motor will stop at the desired end position if the stop had not occurred. Try this again, but do not use the Relative to previous target position and you will see the difference.
Motion Task Transition Types
As the target position of the first task is reached, the acceleration blends into the second task. This prevents the motor from decelerating to zero before starting the second move. This only works when both accelerations are driving the motor in the same direction.

In this method, the target position is reached as the velocity of the second move is reached. The blending begins prior to reaching the target position. The blending is completed at the target position of the first move, and the traverse velocity of the second move. This only works when both velocities are in the same direction.

Executing Motion Tasks
A Motion Task can only be executed if it is valid. Motion Tasks that have been entered correctly will have a green check in the Valid column next to them:

To execute, highlight the motion task you wish to execute. If it is Valid the Start button will enable. Press the start button to begin the motion task and the Stop button to cease the motion task.
Registration Moves
See Registration Moves.


