Shared Directory
This tab provides the ability to connect to and mount a shared directory on a remote computer (Windows® 7 or better, and non-Windows). This allows a program to read and parse instructions for motion. Once the shared directory is mounted, the contents may be navigated in the Shared Network Directory Viewer section of this tab. The following fields must be set to connect to the share.

| IP Address | Enter the IP Address of the computer that has a shared directory. |
| Domain Name | The network domain of the computer that is sharing the directory. This field may or may not be necessary. |
| NetBIOS Name | The unique name that identifies the computer on the network. For Windows computers, this is typically the computer name. |
| Shared Directory Name | Enter the name of the shared directory as defined on the remote computer. The contents of this directory will be displayed in the viewer. |
| User Name | The name of a user that is allowed access to the shared directory. If the user name is that of a domain user (instead of a local user), then the computer that hosts the shared folder must be connected to the domain in order to validate the name. |
| User Password | The password of a user that is allowed access to the shared directory. |
| Windows File System | Indicate whether the remote computer is Windows or a different operating system. This is used to automatically set file permissions. |
| Mount Status | This field indicates whether the directory Is Mounted or Is Not Mounted. |
| Apply | Pressing this button will mount the share and save the configuration to flash memory so it can be automatically mounted at power-on. This button is disabled when the application is running and when the user is not logged in. |
| Clear | Pressing this button will clear the above fields, unmount the share, and clear the configuration from flash memory. This button is disabled when the application is running and when the user is not logged in. |
| Refresh | Refresh the contents of the fields and the Shared Directory Viewer. |
Example of how to share a directory from Windows:
- In Windows Explorer, navigate to the directory you wish to share.
- Select Share with from the Toolbar.
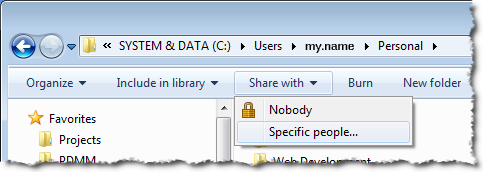
- Using the resulting window, select the users and/or groups who that should have access to the directory.
-
- We strongly recommend consulting with your IT department for setting up and connecting to a shared directory. With differences between operating systems and the variability of security settings, this can become challenging.
See also Shared Directory Path Conventions.