Working with SafePLC2 Projects
Jump to a section on this page:
A node can be added to the Project tree connected to a SafePLC2 project.
- This is used to synchronize a SafePLC2 project with a KAS project.
- The KAS-IDE
 "Integrated development environment"
An integrated development environment is a type of computer software that assists computer programmers in developing software.
IDEs normally consist of a source code editor, a compiler and/or interpreter, build-automation tools, and a debugger automatically generates the PDOs for the connected devices and establishes the Black Channel A Black Channel allows transmission of safety data via the standard network line. Safety over EtherCAT frames, known as safety containers, contain safety-critical process data and additional information used to secure this data. The safety containers are transported as part of the communication’s process data. with the EtherCAT ***EtherCAT is an open, high-performance Ethernet-based fieldbus system. The development goal of EtherCAT was to apply Ethernet to automation applications which require short data update times (also called cycle times) with low communication jitter (for synchronization purposes) and low hardware costs Safety network.
"Integrated development environment"
An integrated development environment is a type of computer software that assists computer programmers in developing software.
IDEs normally consist of a source code editor, a compiler and/or interpreter, build-automation tools, and a debugger automatically generates the PDOs for the connected devices and establishes the Black Channel A Black Channel allows transmission of safety data via the standard network line. Safety over EtherCAT frames, known as safety containers, contain safety-critical process data and additional information used to secure this data. The safety containers are transported as part of the communication’s process data. with the EtherCAT ***EtherCAT is an open, high-performance Ethernet-based fieldbus system. The development goal of EtherCAT was to apply Ethernet to automation applications which require short data update times (also called cycle times) with low communication jitter (for synchronization purposes) and low hardware costs Safety network.
These are the methods for creating the synchronization between KAS Runtime![]() In computer science, runtime (or run-time) describes the operation of a computer program, the duration of its execution, from beginning to termination (compare compile time).
Within KAS, runtime also refers to the virtual machine that manage the program written in a computer language while it is running and SafePLC2:
In computer science, runtime (or run-time) describes the operation of a computer program, the duration of its execution, from beginning to termination (compare compile time).
Within KAS, runtime also refers to the virtual machine that manage the program written in a computer language while it is running and SafePLC2:
- Direct Method Connection - This is used when both the KAS-IDE and SafePLC2 are installed on the same computer.
- Import Method Connection - This is used when KAS-IDE and SafePLC2 are installed on different computers.
See the online help or the AKT2G I/O Manual for detailed directions.
Direct Method Connection
This method is used when SafePLC2 is installed on the same computer as the KAS-IDE. The steps assume you have already added a SafePLC2 project to the KAS project tree (see Add or Import a SafePLC2 Project).
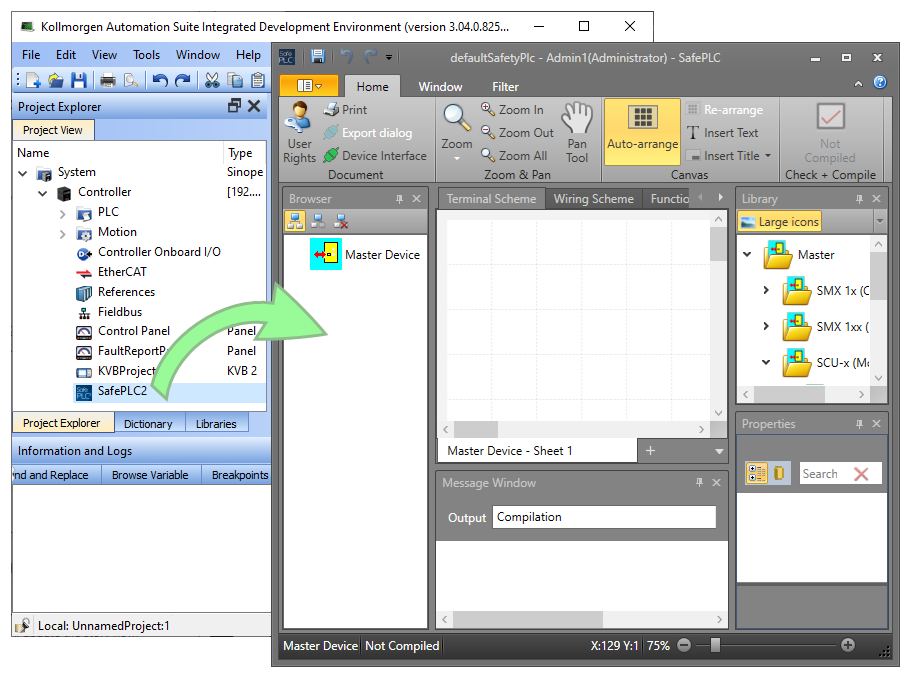
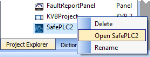
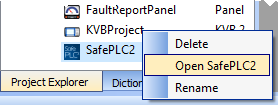
- Double-click on the SafePLC2 node. Alternatively, right-click on SafePLC2 and select Open SafePLC2.
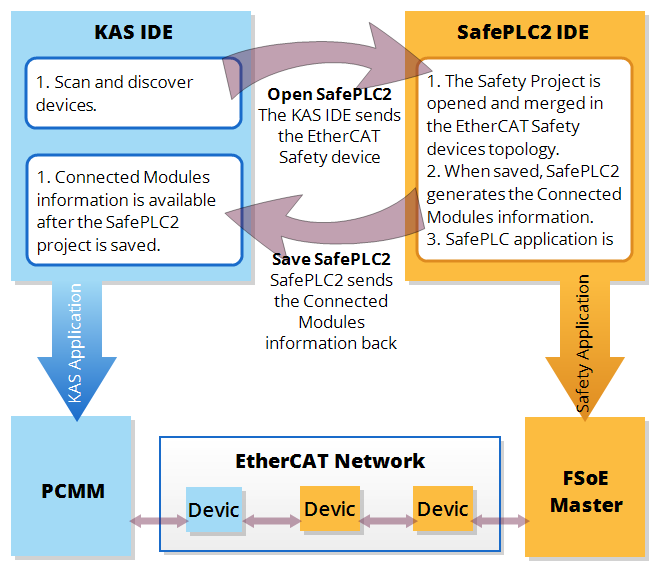
- SafePLC2 will be launched and the Safety Project will be opened. SafePLC2 automatically populates the safety devices from the EtherCAT Safe topology defined in the KAS-IDE.
- Complete and save the SafePLC2 Safety Project.
- Compile the Safety Project and download it to the SCU1 controller.
- Return to the KAS-IDE, complete and compile the project.
The KAS-IDE automatically creates the required black channel communication required for FSoE from the connected module information passed to the KAS-IDE from SafePLC2.
- Download the compiled KAS application to the controller and run it.
- The Black Channel will establish the Safety network connection when EtherCAT goes into the operational state.
- The SCU will transition to Run mode.
-
-
- The KAS project supports a single SafePLC2 instance and project.
- The SafePLC2 node cannot be deleted while the application is running.
- The KAS-IDE cannot be closed while SafePLC2 is running with a synchronized project.
See Also:
Import Method Connection
This method is used when the KAS-IDE and SafePLC2 are not installed on the same computer. The steps assume you have already added a SafePLC2 project to the KAS project tree.
![]()
- Export the SafePLC2 node (see Export a SafePLC2 Project).
- Name and save the .k2s Safety Project file.
- Transfer the exported file to a computer which has SafePLC2 installed.
- Open the Safety Project file with SafePLC2. SafePLC2 automatically populates the safety devices from the EtherCAT Safe topology defined in the KAS-IDE.
- Complete and save the SafePLC2 Safety Project.
- Compile the Safety Project and download it to the SCU1 controller.
- Transfer the completed .k2s Safety Project file back to the computer with the KAS-IDE.
- Import the completed Safety Project (see Add or Import a SafePLC2 Project).
- Complete and compile the KAS project.
The KAS-IDE automatically creates the required black channel communication required from the connected module information passed to KAS from SafePLC2.
- Download the compiled KAS application to the controller and run it.
- The Black Channel will establish the Safety network connection when EtherCAT goes into the operational state.
- The SCU will transition to Run mode.
Add or Import a SafePLC2 Project
A SafePLC2 project may be added to the KAS-IDE, or you may import an existing project.
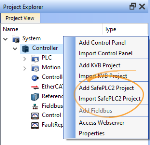
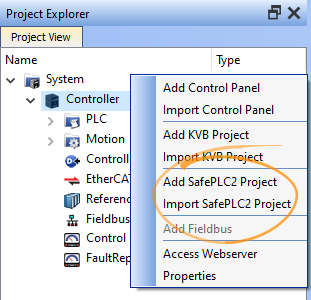
- Right click on Controller in the Project tree.
- Select Add SafePLC2 Project or Import SafePLC2 Project.
When importing a project you are prompted to select the file's location.
- There may only be a single instance of a SafePLC2 project in the KAS-IDE.
- If none exists, a SafePLC2 Project is added to the end of the Project tree.
- If there is a project, you are prompted to overwrite the project or cancel the import.
- The import cannot occur if SafePLC2 is running.
- There may only be a single instance of a SafePLC2 project in the KAS-IDE.
- A node is added to the end of the Project tree.
Export a SafePLC2 Project
- Right-click on the SafePLC2 node in the Project tree and select Export.
- Navigate to and select the location to save the exported file.
- Click Save.
Connect SafePLC2 to an SCU-1-EC
-
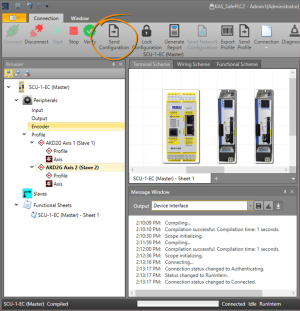
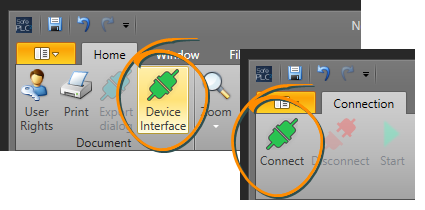
Connect to the SCU-1-EC by clicking the “Device Interface” and then click the Connect button.

-
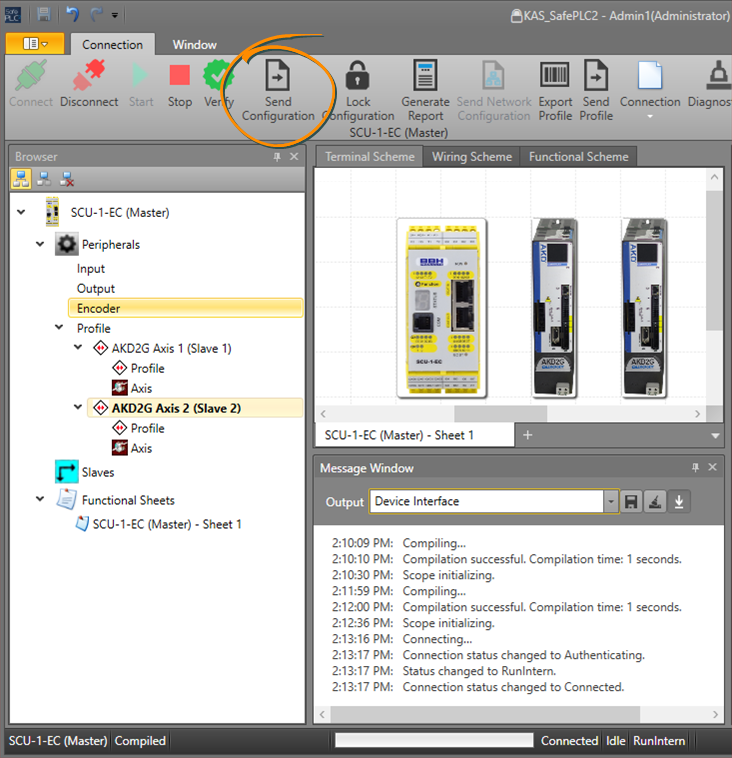
After successfully connecting to the device, click the “Send Configuration” to download the safety application.
-
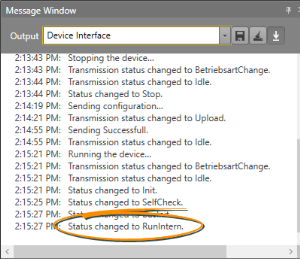
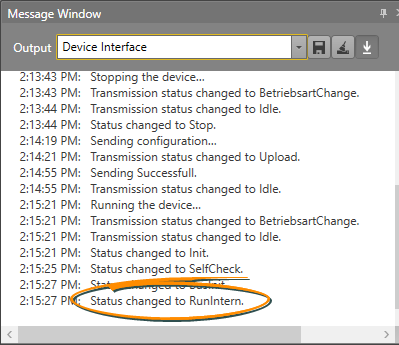
The download status is available at the status bar of the SafePLC2 application.

-
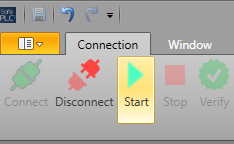
After a successful download of the application, click on the “Start” button to run the safety application.
-
The status of the SCU will change to “RunIntern”
Put It Together: KAS, SCU-1-EC, and the AKD2G Working Together
-
Run the KAS application.
-
When the “Execute” input on the FSoEParamsInit function block goes high, the safety parameters are transferred to the AKD2G.
-
On a successful transfer, the safety network will start exchanging the Safety Process Data.
-
SafePLC shows the message “Status Changed to Run” in the message window.
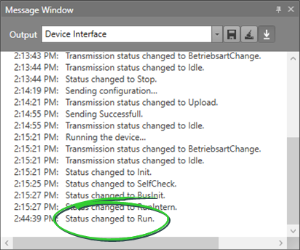
- The Status LED on the BBH SCU-1-EC will display "4".

-
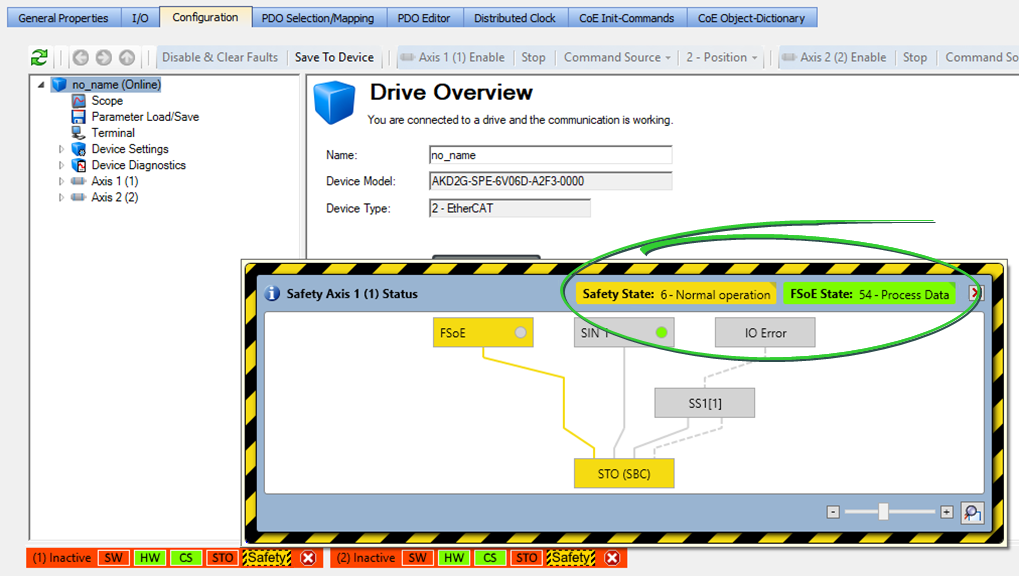
The status of the AKD2G drive in KAS-IDEWorkBench or WorkBench will display “Safety State: 6 – Normal operation” and “FSOE State: 54 - Process Data”

-
- Checking the AKD2G's status is also recommended.
-