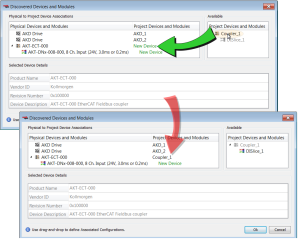
EtherCAT Scan and Association
Physical EtherCAT devices, modules, couplers, and slices are discovered during the Scan Devices routine and are automatically set as project devices in the Project Tree.
- These device associations persist through subsequent scans unless you change them.
- The Scan Devices is accessed by double-clicking the EtherCAT node in the Project Explorer, then pressing the Scan Devices button in the Devices tab.
Changing the network's physical topology (by adding moving, or removing devices) or changing the associations between physical devices and project devices will require that Scan Devices be run again. The Discovered Devices and Modules window will display any changes and the Modify button will be enabled. When Modify is clicked the dialog box expands to show Available Project Devices and Modules. Click on a device and drag it to the corresponding New Device to create an association. Repeat as necessary for slices and modules.
Once the associations are complete, click Ok. See the following procedures for more details.
- New projects with no project devices: Scan and Associate Network Devices. This creates default configurations for the discovered physical devices/modules and couplers/slices.
- Adding, removing, or moving devices: Re-Scan and Change Device Associations.
- Adding, removing, or moving couplers with slices: Re-Scan and Change Coupler/Slice Associations.
- Adding, removing, or moving devices with modules: Re-Scan and Change Device/Module Associations.
The physical network topology will be compared to the project's expected network topology after the EtherCAT devices are associated and the PLC application is started. An error will be reported if the topologies do not match and the PLC program will not run.
-
-
The physical topology must match the project's expected topology for the PLC application to operate the devices properly.


