OPC-UA - Establish a Server Connection with Certificates - UaExpert
These are the overall steps when using certificates for an OPC UA Server connection:
1. PCMM2G Configuration (with Certificates)
-
-
Videos of these features are here: PCMM2G OPC UA Server Setup in KAS-IDE.
1. PCMM2G Configuration (with Certificates)
The procedure in this section configures the PCMM2G for connection to UaExpert.
- Verify the OPC-UA - UaExpert Installation procedure is completed.
- Open a web browser and enter the PCMM2G IP address.
- Login as administrator.
See User Authentication. - Click the KAS Application tab.
- Click the Stop button if the Status of KAS app is started.
- Click the Settings tab.
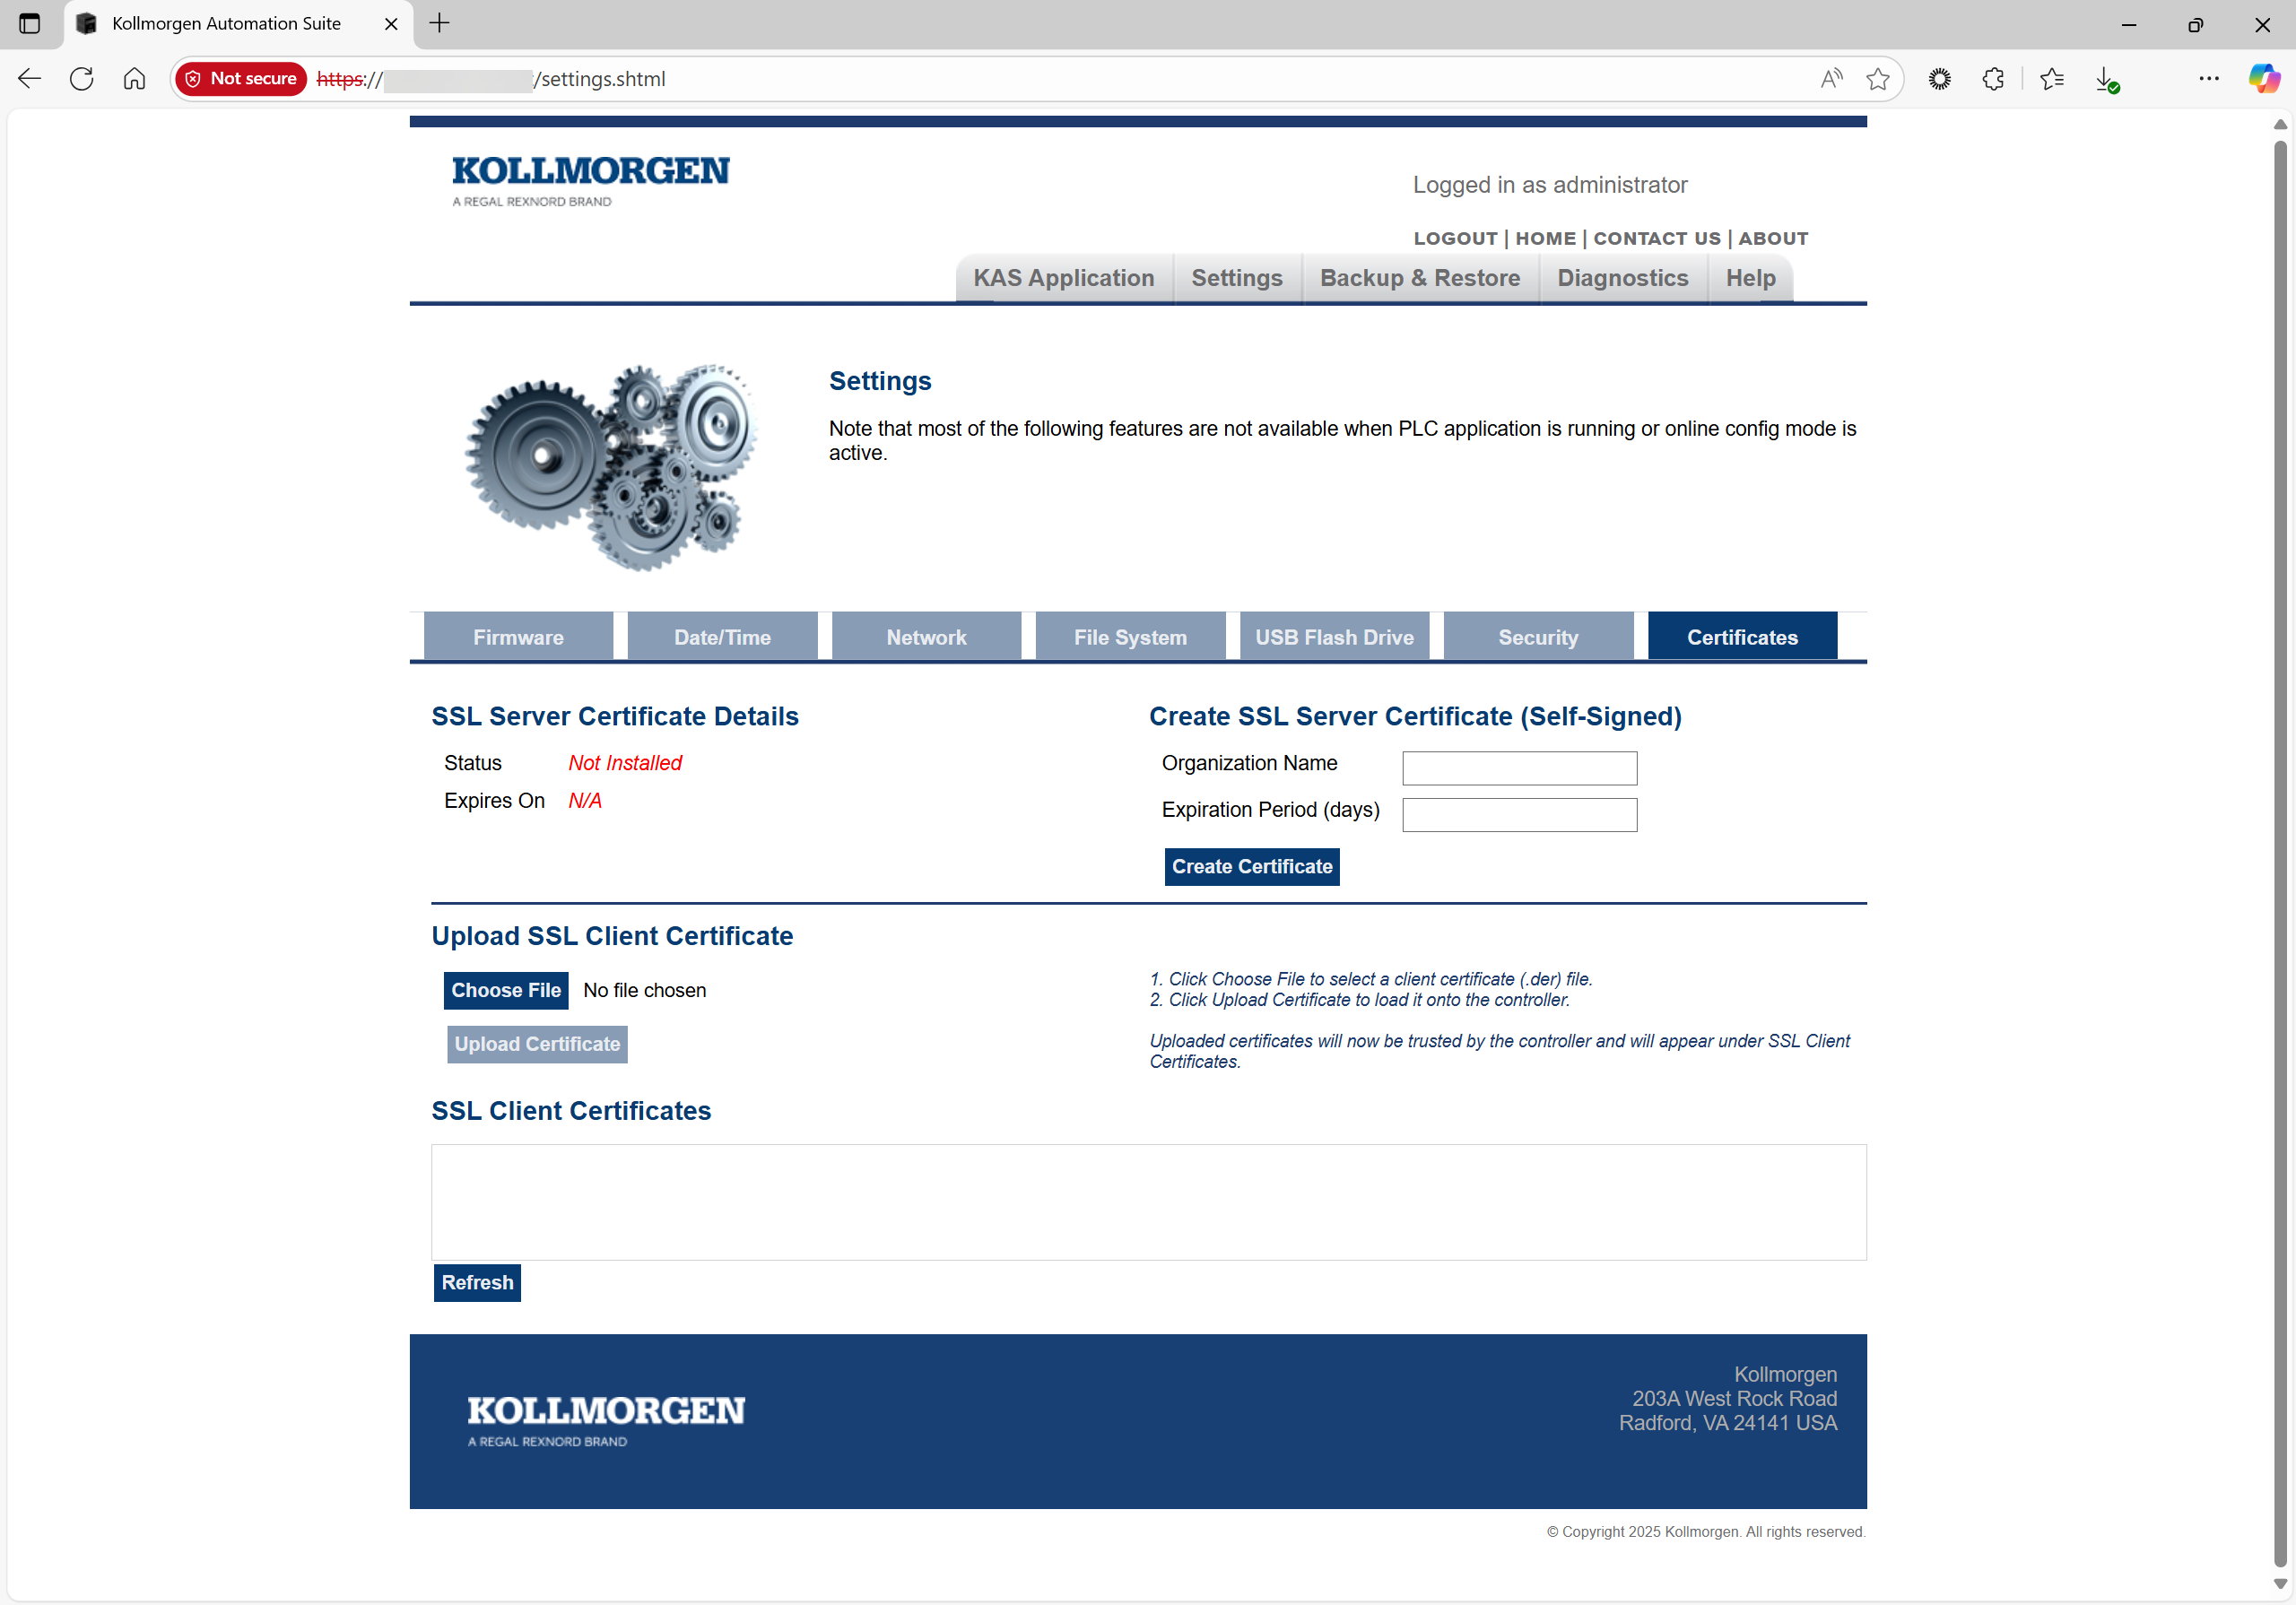
- Click the Certificates tab. (Figure 1)
- If the Status in the SSL Server Certificate Details section is shown as Not Installed, create a new SSL Server Certificate.
See Install the SSL Certificate. - Start the KAS-IDE.
- Create a new project or open an existing KAS project.
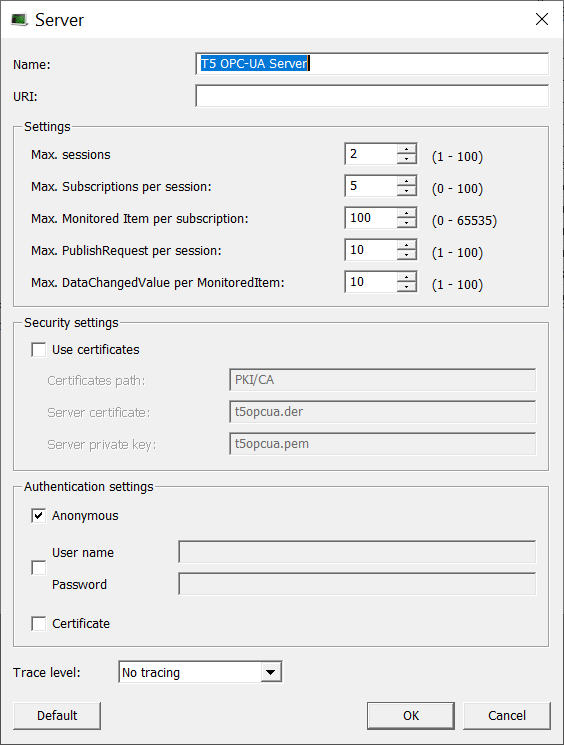
- Double-click an OPC UA Server node in the Fieldbus Editor project tree.
The OPC UA - Server dialog box opens. (Figure 2) - In the Security settings section, click the Use certificates check box to use digital certificates for data encryption between the server and client.
When selected, the text boxes of this section are activated. -
-
Kollmorgen recommends accepting the defaults in the Security settings section to use self-signed certificates.
- In the Authentication settings section:
- Clear the Anonymous check box.
- Optional: Click the User name/Password check box to activate the User name and Password text boxes.
- If applicable, enter a User name and Password for the configuration.
- Click the Certificate check box so the server allows the client to authenticate with a certificate.
- Click OK to save the changes or selections and close the dialog box.
The Fieldbus Editor returns showing the added OPC UA Server node.
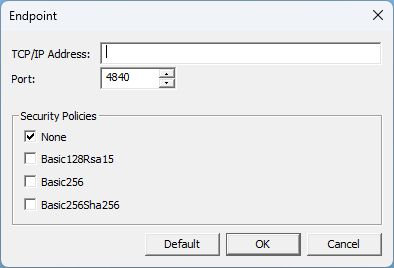
- On the vertical toolbar, click the Insert Master/Port button (
 ).
).
The OPC UA - Endpoint dialog box opens. (Figure 3) - In the Security Policies section:
- Clear the None check box.
- Click the Basic256 or Basic256Sha256 check box to use the 256-bit Basic as the message encryption algorithm.
- Click OK to save the changes or selections and close the dialog box.
The Fieldbus Editor returns.
- Add applicable groups and variables using the OPC UA - Add Multiple Groups and Variables to the Driver Configuration procedure.
- Compile and download the project to the KAS controller (e.g., PCMM2G).
- Continue with 2. UaExpert Configuration (with Certificates).
![]()
2. UaExpert Configuration (with Certificates)
The procedure in this section configures UaExpert for connection to PCMM2G.
- Verify the procedure in the 1. PCMM2G Configuration (with Certificates) section is completed.
- Start UaExpert.
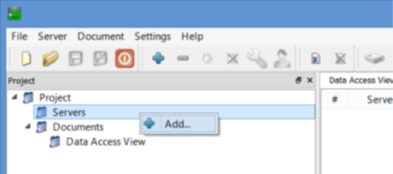
The UaExpert main window opens. - In the Project tree, right-click Servers and click Add. (Figure 4)
- Under Custom Discovery, double-click the text.
The Enter URL dialog box opens. - Enter the URL as opc.tcp://(PCMM2G_IP_Address) to add the OPC UA Server. (Figure 6)
- Click OK to save the changes or selections and close the dialog box.
The Add Server dialog box returns. -
-
A Replace Hostname message may appear. (Figure 7)
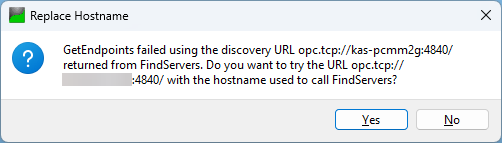
Figure 7: Replace Hostname message
This prompt appears because the PCMM2G supports OPC UA device discovery using its IP address, not by its hostname.
Click Yes to continue.
- Under Custom Discovery, expand the newly added node.
- Under the opc.tcp://(PCMM2G_IP_Address), select Basic256Sha256 – Sign & Encrypt. (Figure 8)
- In the Authentication settings section:
- Click the Certificate / Private Key option button.
- In the Certificate check box, enter the path to the UaExpert certificate.
Example: C:/Users/<<user_name>>/AppData/Roaming/unifiedautomation/uaexpert/PKI/own/certs/uaexpert.der - In the Private Key text box, enter the path to the UaExpert private key. (Figure 9)
Example: C:\Users\<<user_name>>\AppData\Roaming\unifiedautomation\uaexpert\PKI\own\private\uaexpert_key.pem - A Username and Password can be used if this Authentication Setting option is enabled in the KAS project. (Figure 10)
- The password is always encrypted if Use Certificates is enabled in the KAS project.
- Click OK to save the changes or selections and close the dialog box.
The server is now available in the UaExpert project tree.
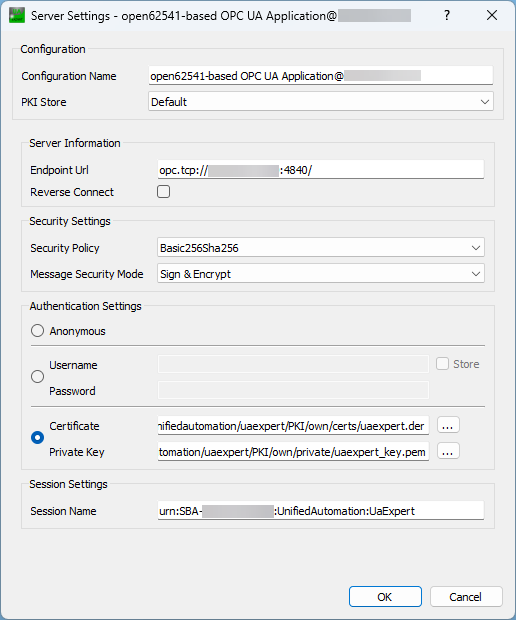
Figure 9: Server Settings dialog box
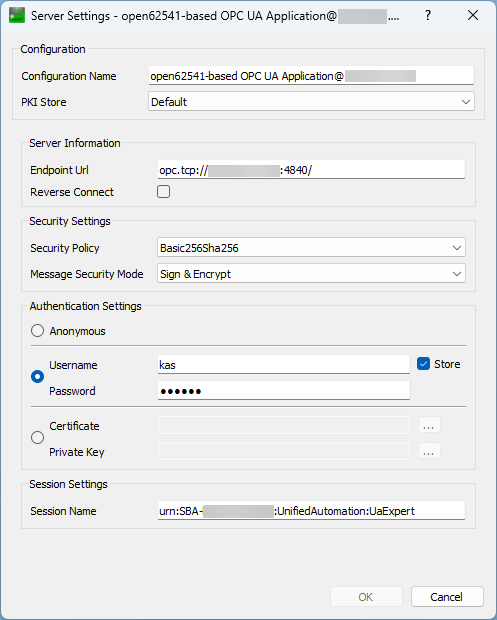
Figure 10: Server Settings dialog box - Username and Password
- On the UaExpert toolbar, click the Settings button and select Manage Certificates > Properties.
The UaExpert Manage Certificates dialog box opens. (Figure 11) - Click the Copy Application Certificate To... button to open the Save As dialog box. (Figure 12)
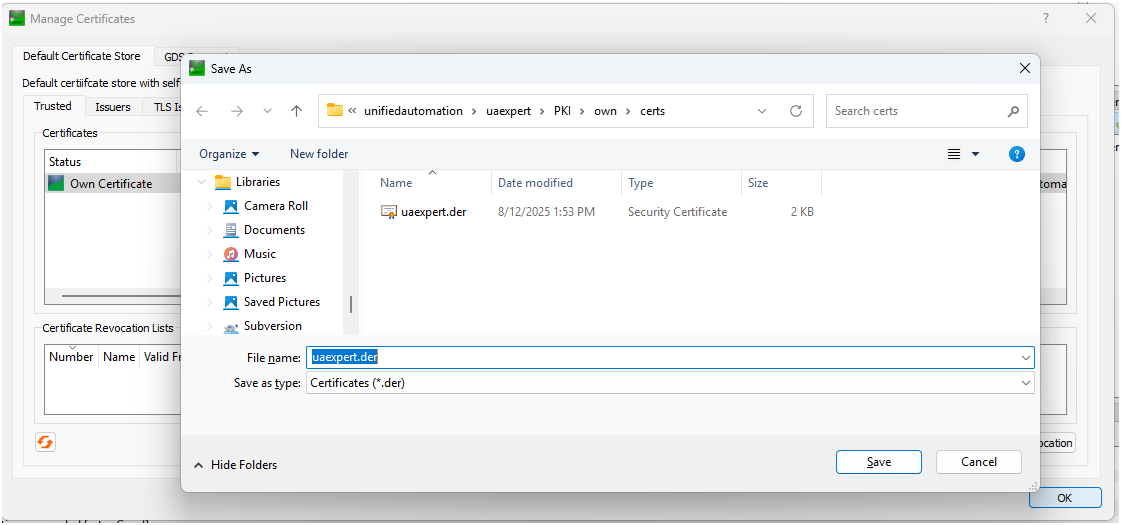
- Save the file uaexpert.der to a temporary directory on the PC (e.g., C:\Temp).
- Click Save to save the file in the designated location and close the dialog box.
- Using the web browser opened in the 1. PCMM2G Configuration (with Certificates) section:
- Click the Settings tab.
- Click the Certificates tab. (Figure 13)
- In the Upload SSL Client Certificate section, click the Choose File button.
A File Explorer window opens. - Locate and select the certificate file uaexpert.der that was saved in Step 12 in section 2. UaExpert Configuration (with Certificates).
- Click Open to confirm the selection and close the File Explorer window.
- Click the Upload Certificate button to upload the file to the PCMM2G.
- The Certificated is added to the PCMM2G trusted store.
- This allows OPC UA connections from UaExpert.
- The file uaexpert.der appears under SSL Client Certificates explorer tree.
- Continue with 3. UaExpert Connection to the PCMM2G (with Certificates).
The Add Server dialog box opens. (Figure 5)
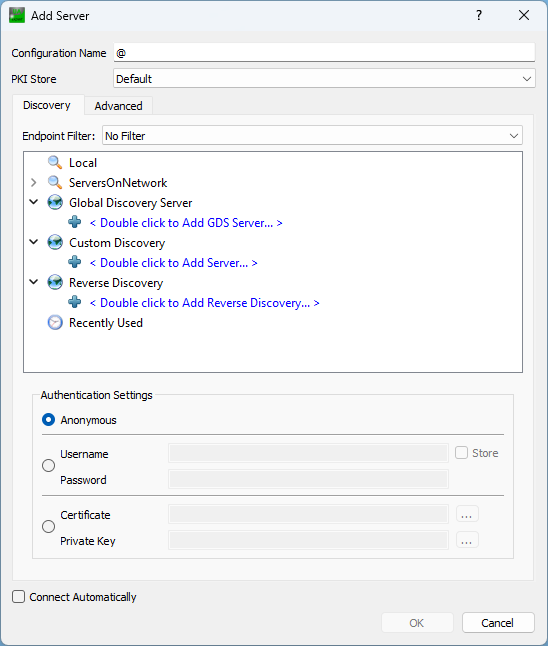
Figure 5: UaExpert Add Server dialog box
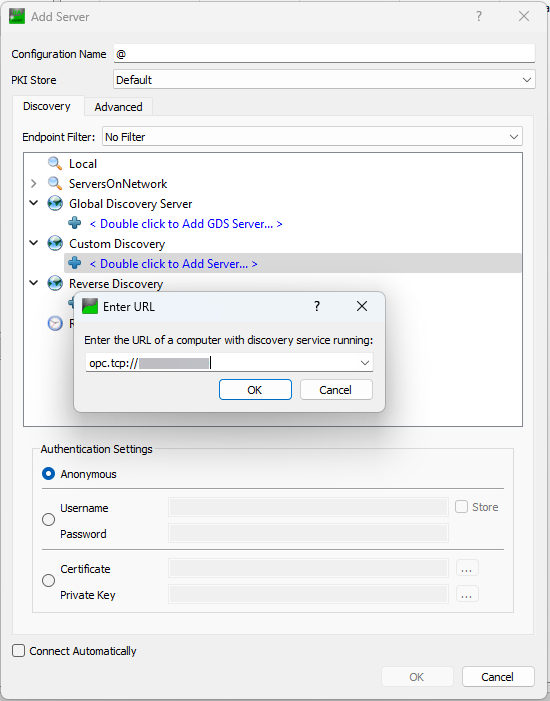
Figure 6: Enter URL dialog box
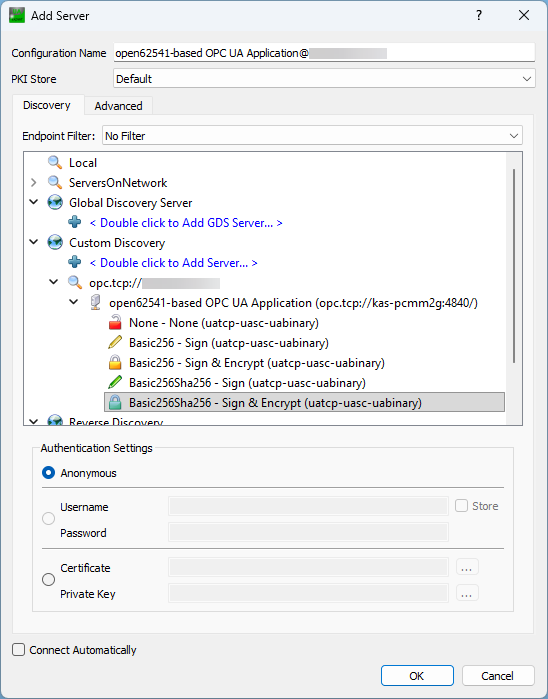
Figure 8: Add Server dialog box - Basic256Sha256 – Sign & Encrypt
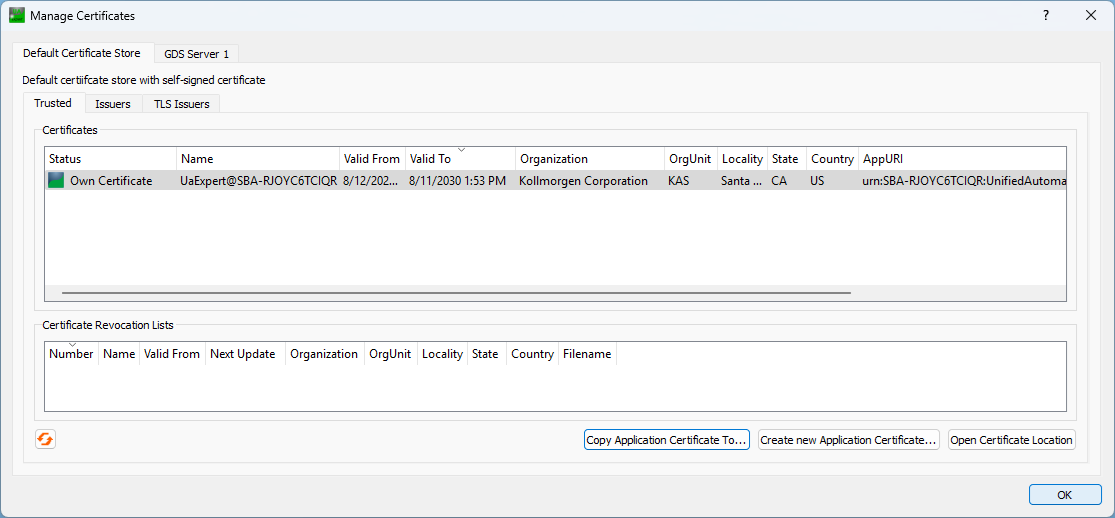
Figure 11: Manage Certificates dialog box
3. UaExpert Connection to the PCMM2G (with Certificates)
The procedure in this section connects UaExpert to the PCMM2G.
- Verify the procedure in the 2. UaExpert Configuration (with Certificates) section is completed.
- On the toolbar, click the Connect button (
 ) to connect to the server.
A Connect Error message opens. (Figure 14) - Click Ignore to continue connecting.
- In the Address Space scroll box, select the applicable PLC object.
- Drag-and-drop the selected objects to the Data Access View table. (Figure 16)
- Verify the values of PLC objects in the Data Access View table matches with the KAS project running on the PCMM2G.
- In the Data Access View table, select a variable.
The Attributes panel appears. - Scroll through the variables to locate a variable with an AccessLevel set to CurrentWrite. (Figure 17)
- Double-click the applicable Value column cell and change its value.
- Switch to the KAS-IDE window.
- Navigate to the OPC UA Server Fieldbus Editor. (Figure 18)
- Change a variable value in the KAS-IDE.
- Verify the change in UaExpert.
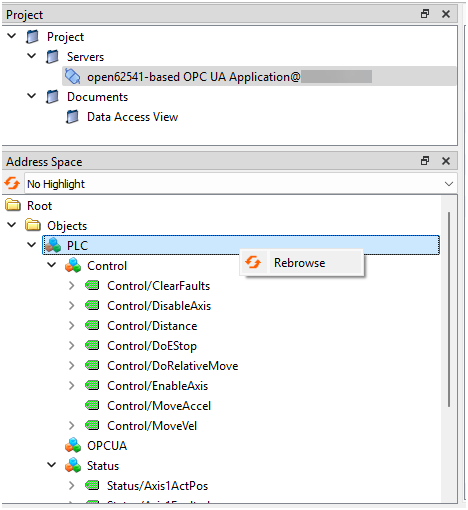
A re-browse of the variable value in UaExpert may be necessary to refresh the visible values. - Select the PLC object and right-click to use Rebrowse. (Figure 19)
-
-
- A maximum of 100 OPC UA client connections are accepted simultaneously.
- Established connections are disconnected if no data is exchanged within 30 seconds.
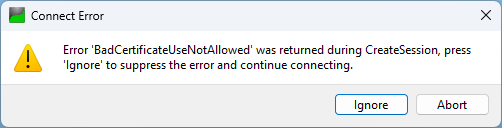
Figure 14: Connect Error message
Data is now available from the KAS/PCMM2G OPC UA Server. (Figure 15)
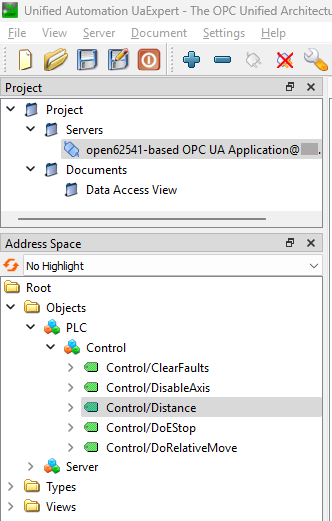
Figure 15: UaExpert - KAS OPC UA Data Objects
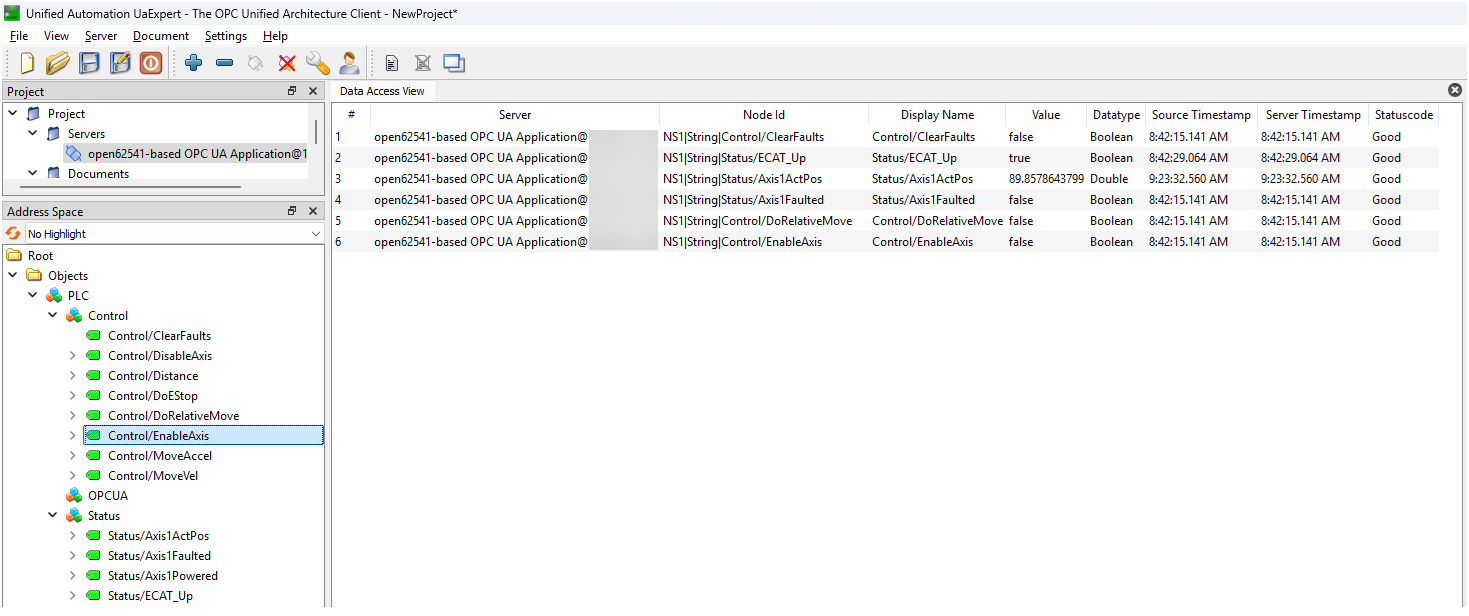
Figure 16: Data Access View table
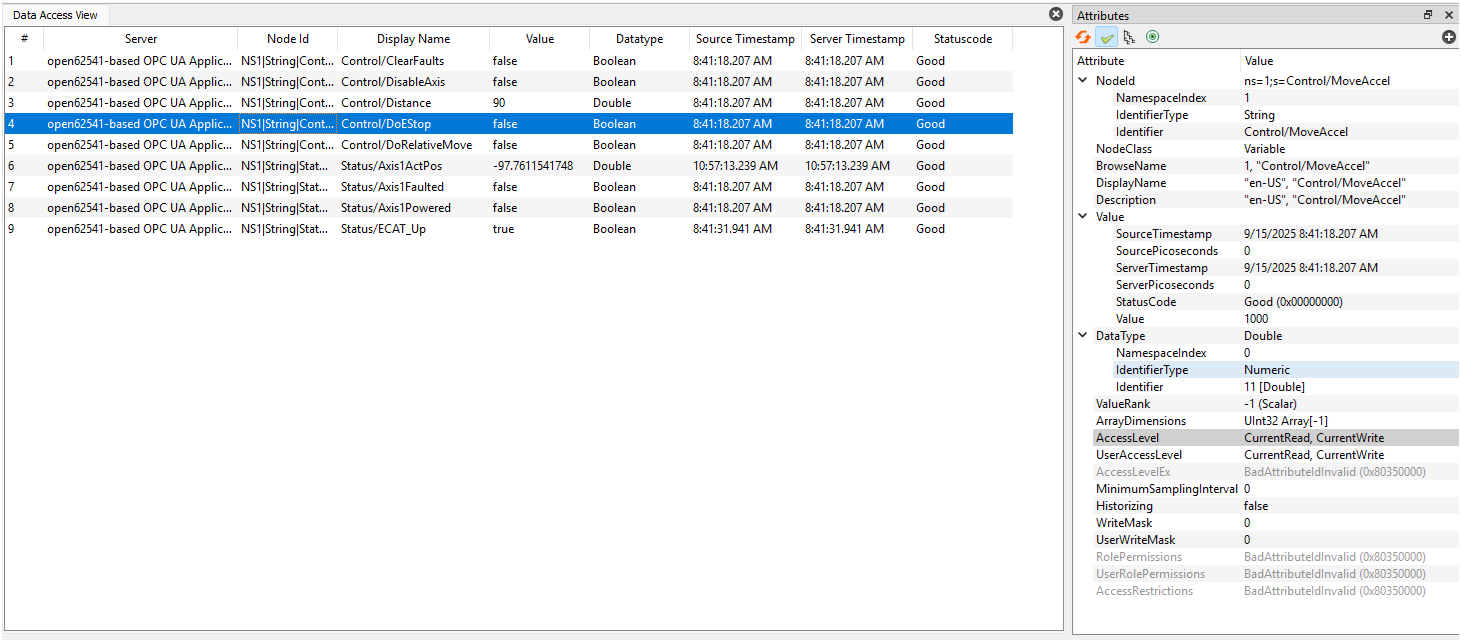
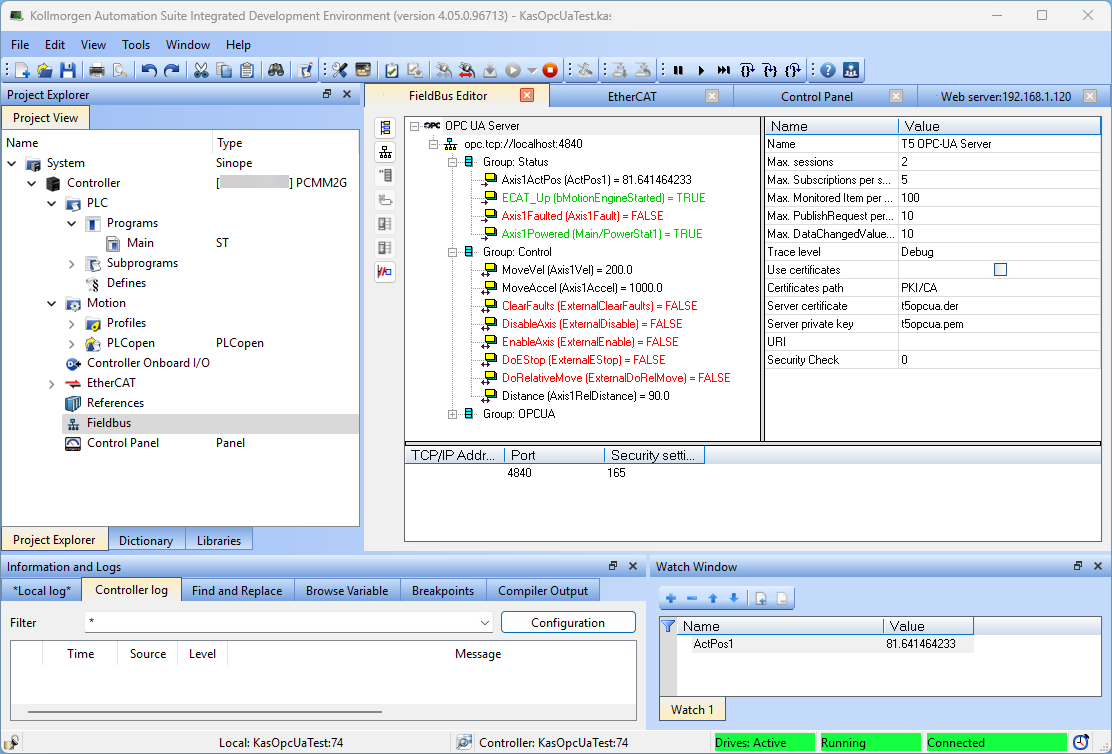
Figure 18: KAS Fieldbus Editor
-
-
- Uploaded certificates are automatically trusted by the OPC UA Server running on PCMM2G.
- The certificates enable secure communication when using Sign or SignAndEncrypt security modes.
- If the certificate is not uploaded, the PCMM2G OPC UA Server rejects the connection attempt from UaExpert.
See Also


