Project Explorer
This window contains all the items used to design, implement, test, and document the application.
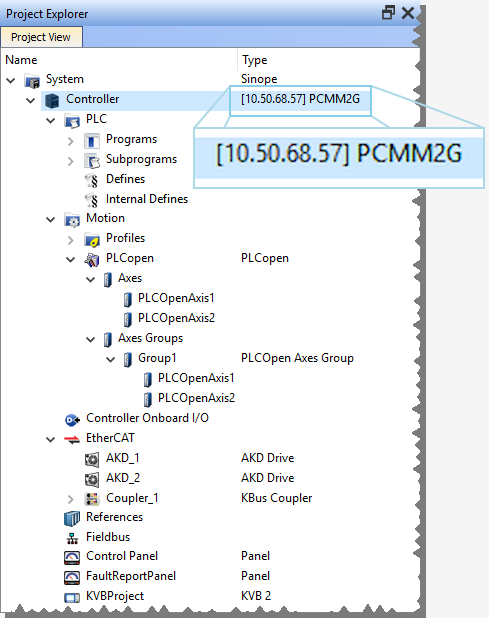
Figure 1: KAS Project Explorer
|
Item |
Description |
|---|---|
|
Hardware |
Devices that make up the system such as Controllers, EtherCAT Motion Bus, servo and stepper drives, HMI devices, I/O Terminals, etc. |
|
Motion |
|
|
PLC (IEC 61131-3) |
|
-
-
Navigate in the project-tree by entering the item's initial letter or using the arrow keys.
A project is made of these items:
-
-
Node Names: Allowed characters for node names include A-Z, a-z, 0-9, . (period), - (hyphen), and _ (underscore).
System
This item concerns the whole project. A right-click opens its menu that provides this option:
|
Command |
Description |
|---|---|
|
Add HMI Device |
|
Controller
A controller is composed of:
- a PLC item
- a Motion item
- a Control Panel
- an EtherCAT Motion Bus
- some References
This item displays the controller's IP address and controller hardware type.
- It is used to Access the Web server From the KAS-IDE.
- The webserver functionality may be used directly in the KAS-IDE.
- See Using the KAS Web server.
-
-
The IP address is shown as
127.0.0.1if the system is in simulation mode.
Controller Node - Context Menu
|
Command |
Description |
|---|---|
|
Add Control Panel |
Add a new control panel to the controller. See Control Panel. |
|
Import Control Panel |
Import a pre-configured control panel for use in the project. |
|
Add KVB Project |
Add a new KVB panel which is embedded into the controller. See KVB Project. |
|
Import KVB Project |
|
|
Add a node to the tree to access a SafePLC2 project directly from the KAS-IDE. See SafePLC2 Projects. |
|
|
Import SafePLC2 Project |
Select a
|
|
Add Fieldbus |
Add a node to access the Fieldbus Editor. |
|
Access Web Server |
This command opens the web server interface in the GUI. See Access the Web server From the KAS-IDE and Using the KAS Web server. |
|
Properties |
Open a dialog box to configure the controller.
Figure 2: Configure the Device Parameters Description
|
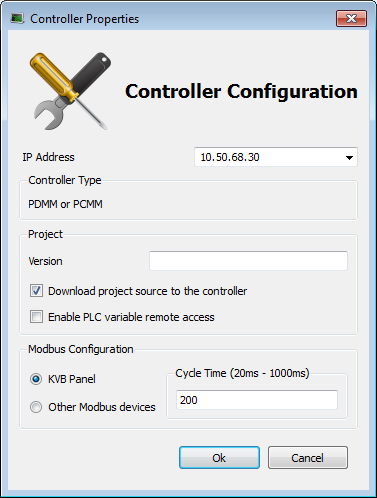
 to choose the simulation mode, this address is disabled.
 PLC
This item contains all the PLC (Virtual Machine) part of the controller.
These items can be present in the PLC:
- Programs
- Subprograms
- Some Defines
|
Command |
Description |
|---|---|
|
Libraries |
Import new libraries |
Programs
|
Command |
Description |
|---|---|
|
Cycle |
Configure the cycle of the virtual machine. See Define the PLC Cycle. |
|
Import a saved program. |
|
|
New Program |
Add new program items: |
-
-
Programs and Subprograms can be reordered by drag-and-drop.
Dragging an item up the list places it above the program you drop it on, while dragging down places it below.
Program Item - Contextual Menu
|
Command |
Description |
|---|---|
|
Add Action Block |
|
|
Import Action Block |
 Click to import all children from one project to another Click to import all children from one project to another
|
|
Add Child SFC |
Add a child program to this program.
|
|
Import Child SFC |
Import a saved SFC program to the current program.
How to import all children from one project to another?
Only local variables are copied (not the global variables). |
|
Save the selected program to your file server, avoiding spaces in the file name. |
|
|
Rename |
Rename the selected program. |
|
Delete |
Delete the selected program. |
|
Print SFC and All Level 2 |
Print all PLC programs. See Print. |
-
-
Double-click the program name to open the program in the workspace.
Subprograms
|
Command |
Description |
|---|---|
|
New Function (Subprogram) |
Add a new subprogram item: |
|
New UDFB |
Add a new UDFB item: |
|
Import |
Import a saved program. |
Subprogram Item - Context Menu
You can create your own functions as well as functional blocks that are called UDFBs (User-Defined Functional Blocks).
For each of them, use these commands:
|
Command |
Description |
|---|---|
|
Export |
Save the selected subprogram onto your file server. |
|
Rename |
Rename the selected subprogram. |
|
Create Unlocked Copy |
Duplicate the selected, locked subprogram. The duplicate is NOT locked. |
|
Delete |
Delete the selected subprogram. |
|
In/Out Parameters |
Open the Program Properties dialog box to Declare Functions or Function Blocks. This item is disabled for locked UDFBs. |
-
-
Double-click the subprogram name to open the subprogram in the workspace.
Defines
- This item contains all the global definitions in the scope of the corresponding device.
- Double-click this item to edit these global definitions.
- See Use the Defines List.
Internal Defines
- This item contains all predefined definitions available for use in KAS projects.
- Double-click this item to view these internal definitions.
- See Internal Defines.
Motion
The motion item contains the motion-specific items (e.g., the Profiles and Pipe Network items).
|
Command |
Description |
|---|---|
|
Motion Engines |
Choose the motion engine for the application Pipe Network or PLCopen. |
Profiles
This item contains all the cam profiles in the project.
|
Command |
Description |
|---|---|
|
New Profile |
Create a new cam profile and add it to this device (*.csv, *.cam). See Add CAM Profiles. |
|
Import |
Import already existing cam profiles to a project. |
|
Show Compiled Code |
Show the code corresponding to the selected cam profile. |
Right-click a cam profile to use these additional commands:
|
Command |
Description |
|---|---|
|
Rename |
Change the cam profile to a different name. |
|
Delete |
Remove the cam profile from the list. |
|
Export |
Save the cam profile in (.CAM) format. |
|
Properties |
Opens a dialog to modify the cam profile's Master/Input Slave/Output Offset and Scale values. |
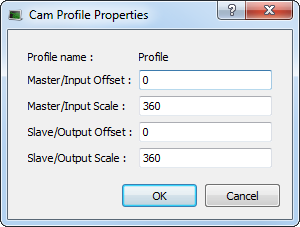
See Add CAM Profiles and Cam Profile Editor.
Pipe Network
This menu applies to the Pipe Network in the project.
|
Command |
Description |
|---|---|
|
Import and Replace |
This command replaces the existing Pipe Network with a pre-saved Pipe Network. A dialog box opens to locate the pre-saved file. The Pipe Network Editor is opened when the file is imported. |
|
Export |
Export the Pipe Network to a file for reuse. |
|
Show Compiled Code |
Show the code corresponding to the Pipe Network. |
-
-
The existing EtherCAT axis mapping is lost when using Import and replace.
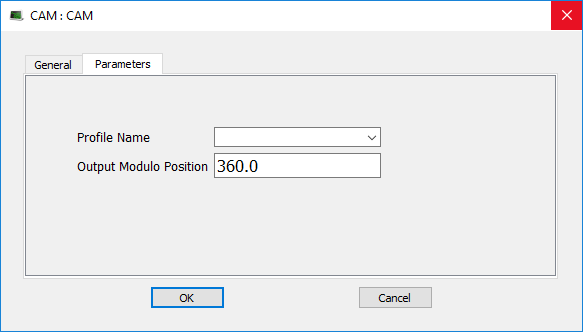
Profiles assigned to Cam blocks are cleared.- In the Project View, double-click EtherCAT to open the EtherCAT Devices tab.
- Use the tab to reassign the axes.
- Double-click any cam of the blocks and set the Profile_Name parameter.
-
-
Double-click to open the Pipe Network in the workspace.
PLCopen
|
Command |
Description |
|---|---|
|
New Axis |
Add a new axis to your project. |
|
Show Compiled Code |
Show the code corresponding to the PLCopen. |
Axes
- Each axis is listed here, whether it is found via a scan of the EtherCAT network, or added manually.
- To add an axis manually, right-click and select New Axis.
For each PLCopen axis, use these commands:
|
Command |
Description |
|---|---|
|
Properties |
Open a dialog box to Change a PLCopen Axis. |
|
Delete |
Delete the selected axis. |
Axes Groups
Axes Groups are collections of related axes defined by the data type AXIS_GROUP_REF.
- They are typically used by coordinated motion and function blocks such as MC_SetKinTra.
- Right-click in this section to create a new Axes Group.
- Groups are populated by dragging an existing axis from the above section into the group.
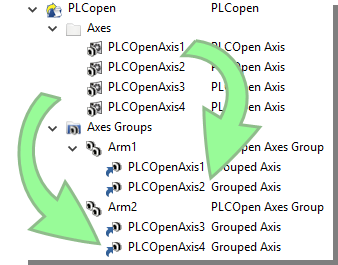
These commands are available by right-clicking on a group.
|
Command |
Description |
|---|---|
|
Delete |
Delete the selected Axes Group. |
|
Rename |
Change the name of the Axes Group. |
Control Panel
The Control Panel is used to provide a basic interface between you and the virtual machine.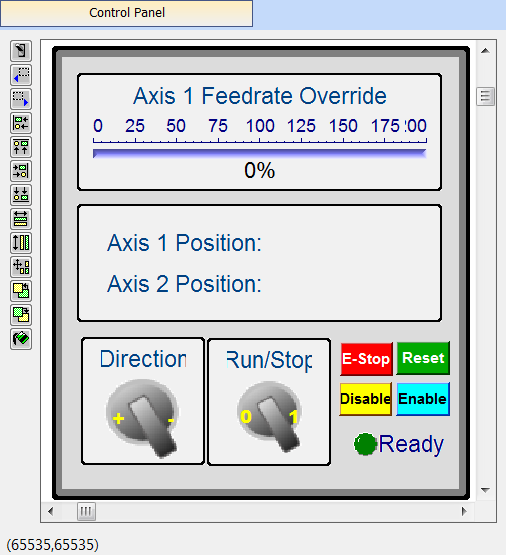
- See Design the HMI with the Internal Editor.
- See KVB Project for a more advanced tool to build HMI.
|
Command |
Description |
|---|---|
|
Rename |
Rename the selected Control panel. |
|
Delete |
Delete the selected Control panel. |
|
Export |
Export the control panel for use in other projects. |
-
-
Double-click to open the Control Panel in the workspace.
Controller Onboard I/O
|
Command |
Description |
|---|---|
|
Properties |
Open the Properties dialog box to configure the local I/O for the AKD PDMM or PCMM controller. |
EtherCAT
This item gives access to all the devices linked to the EtherCAT Motion Bus.
|
Command |
Description |
|---|---|
|
Add Device… |
In the Project view, add a Kollmorgen drive, power supply, or coupler, per a third-party EtherCAT device to the EtherCAT node. |
|
Scan Devices |
|
|
Enable/Disable Online Configuration Mode |
|
|
Properties |
|
See Add and Configure Third-party EtherCAT Devices.
AKD2G Drive
Double-click an AKD2G to set its parameters.
See Configure the Kollmorgen Servo Drive.
|
Command |
Description |
|---|---|
|
Rename |
Rename the selected drive. |
|
Delete |
Delete the selected drive. |
|
Configuration |
Opens the Configuration tab for the AKD GUI. |
|
Properties |
Select the Properties menu to access the EtherCAT device's configuration views. |
AKD Drive
Double-click an AKD to set its parameters.
See Configure the Kollmorgen Servo Drive.
|
Command |
Description |
|---|---|
|
Rename |
Rename the selected drive. |
|
Delete |
Delete the selected drive. |
|
Configuration |
Opens the Configuration tab for the AKD GUI. |
|
Properties |
Select the Properties menu to access the EtherCAT device's configuration views. |
AKD-C Central Power Supply
Double-click an AKD-C to set its parameters.
See Configure the Kollmorgen Servo Drive.
|
Command |
Description |
|---|---|
|
Rename |
Rename the selected device. |
|
Delete |
Delete the selected device. |
|
Properties |
Select the Properties menu to access the EtherCAT device's configuration views. |
|
Configuration |
Opens the Configuration tab for the AKD GUI. |
AKD-N Drive
Double-click an AKD-N to set its parameters.
See Configure the Kollmorgen Servo Drive.
|
Command |
Description |
|---|---|
|
Rename |
Rename the selected drive. |
|
Delete |
Delete the selected drive. |
|
Properties |
Select the Properties menu to access the EtherCAT device's configuration views. |
|
Configuration |
Opens the Configuration tab for the AKD GUI. |
AKT (K-Bus) I/O Coupler
The Standard I/O Coupler node gives access to its I/O slices.
|
Command |
Description |
|---|---|
|
Add I/O Slice |
Add a new slice (Digital or Analog Input and Output) to the selected Standard I/O Coupler. |
|
Rename |
Rename the selected coupler. |
|
Delete |
Delete the selected coupler. |
|
Properties |
Select the Properties menu to access the EtherCAT device's configuration views. |
-
- These commands are disabled when the controller is running.
See Troubleshooting about diagnosing the coupler LEDs.
AKT2G (EtherCAT) I/O Coupler
The Coupler node acts as a gateway for E-Bus I/O slices.
|
Command |
Description |
|---|---|
|
Rename |
Rename the selected coupler. |
|
Delete |
Delete the selected coupler. |
|
Properties |
Select the Properties menu to access the EtherCAT device's configuration views. |
-
- These commands are disabled when the controller is running.
See Remote Input/Output Terminals.
I/O Slice
- AKT (K-Bus) slices are children of the AKT I/O Coupler.
- AKT2G (E-Bus) slices are children of the EtherCAT node.
|
Command |
Description |
|---|---|
|
Rename |
Rename the selected slice. |
|
Delete |
Delete the selected slice. |
|
Properties |
Open the Properties dialog box to configure the I/O slice. |
Device
Double-click a Device to access its EtherCAT device configuration views.
|
Command |
Description |
|---|---|
|
Rename |
Rename the selected device |
|
Delete |
Delete the selected device |
|
Add Module… |
Add a module to an MDP device. |
|
Properties |
Access the EtherCAT device's configuration views. |
Module
|
Command |
Description |
|---|---|
|
Rename |
Rename the selected module. |
|
Delete |
Delete the selected module. |
References
Used to insert references into a project.
Each reference is a user-defined reference that links any kind of deliverable to your project.
|
Command |
Description |
|---|---|
|
Insert Reference |
Link any kind of deliverable to your current project. |
|
Delete |
Delete the reference. |
|
Properties |
Open the referenced file in the workspace. |
-
-
Double-click to open the Reference in the workspace.
Fieldbus
This item holds the Fieldbus Editor to configure the Ethernet/IP or Profinet fieldbuses.
See Fieldbus Editor.
HMI Device
This item holds the HMI (Human Machine Interface) item used to provide an advanced interface between you and the virtual machine.
|
Command |
Description |
|---|---|
|
Add KVB Project |
|
|
Import KVB Project |
|
|
Rename |
Rename the selected HMI device. |
|
Delete |
Delete the selected HMI device. |
KVB Project
|
Command |
Description |
|---|---|
|
Open KVB |
Opens the associated KVB project. |
|
Rename |
Rename the selected KVB panel. |
|
Delete |
Delete the selected KVB panel. |
|
Export |
Save a copy of the panel in a compressed (.ZIP) file. |
-
-
Double-click the entry to open the KVB panel in Kollmorgen Visualization Builder.
SafePLC2 Project
|
Command |
Description |
|---|---|
|
Delete |
Delete the SafePLC2 project. |
|
Export |
Select a location and name to export / create a SafePLC2 file. |
|
Open SafePLC2 |
|
|
Rename |
Rename the SafePLC2 project. |
-
-
Double-click the entry to open SafePLC2.


