Migrate from a PxMM to a PCMM2G Controller
-
- This procedure is intended for users with AKD PDMM or PCMM (PxMM) experience.
These are the basic steps to migrate data from a PxMM to a PCMM2G Controller.
Prepare the User .KAS Project for Migration
- Download and install the latest KAS-IDE
 "Integrated development environment"
An integrated development environment is a type of computer software that assists computer programmers in developing software.
IDEs normally consist of a source code editor, a compiler and/or interpreter, build-automation tools, and a debugger software from here: KAS IDE Distribution.
"Integrated development environment"
An integrated development environment is a type of computer software that assists computer programmers in developing software.
IDEs normally consist of a source code editor, a compiler and/or interpreter, build-automation tools, and a debugger software from here: KAS IDE Distribution. - Download the latest PxMM firmware.
- AKD PDMM: AKD PDMM Firmware / Software Download.
- PCMM: PCMM Firmware / Software Download.
- Use the Web server to complete the Upgrade the Controller's Firmware procedure.
- Backup the .KAS project to migrate.
We recommend you make a backup copy of your .KAS project so any project or code changes can be verified independently. - Start the KAS-IDE.
- Click File > Open to search for and open the .KAS project.
- Review and make code changes to the project code to be compliant with the Program a Multi-Core Controller guidelines.
- Compile and download the .KAS project to the PxMM.
- Run the Project and verify it is working as expected.
- Save the .KAS project.
- Continue with PCMM2G Hardware Preparation.
PCMM2G Hardware Preparation
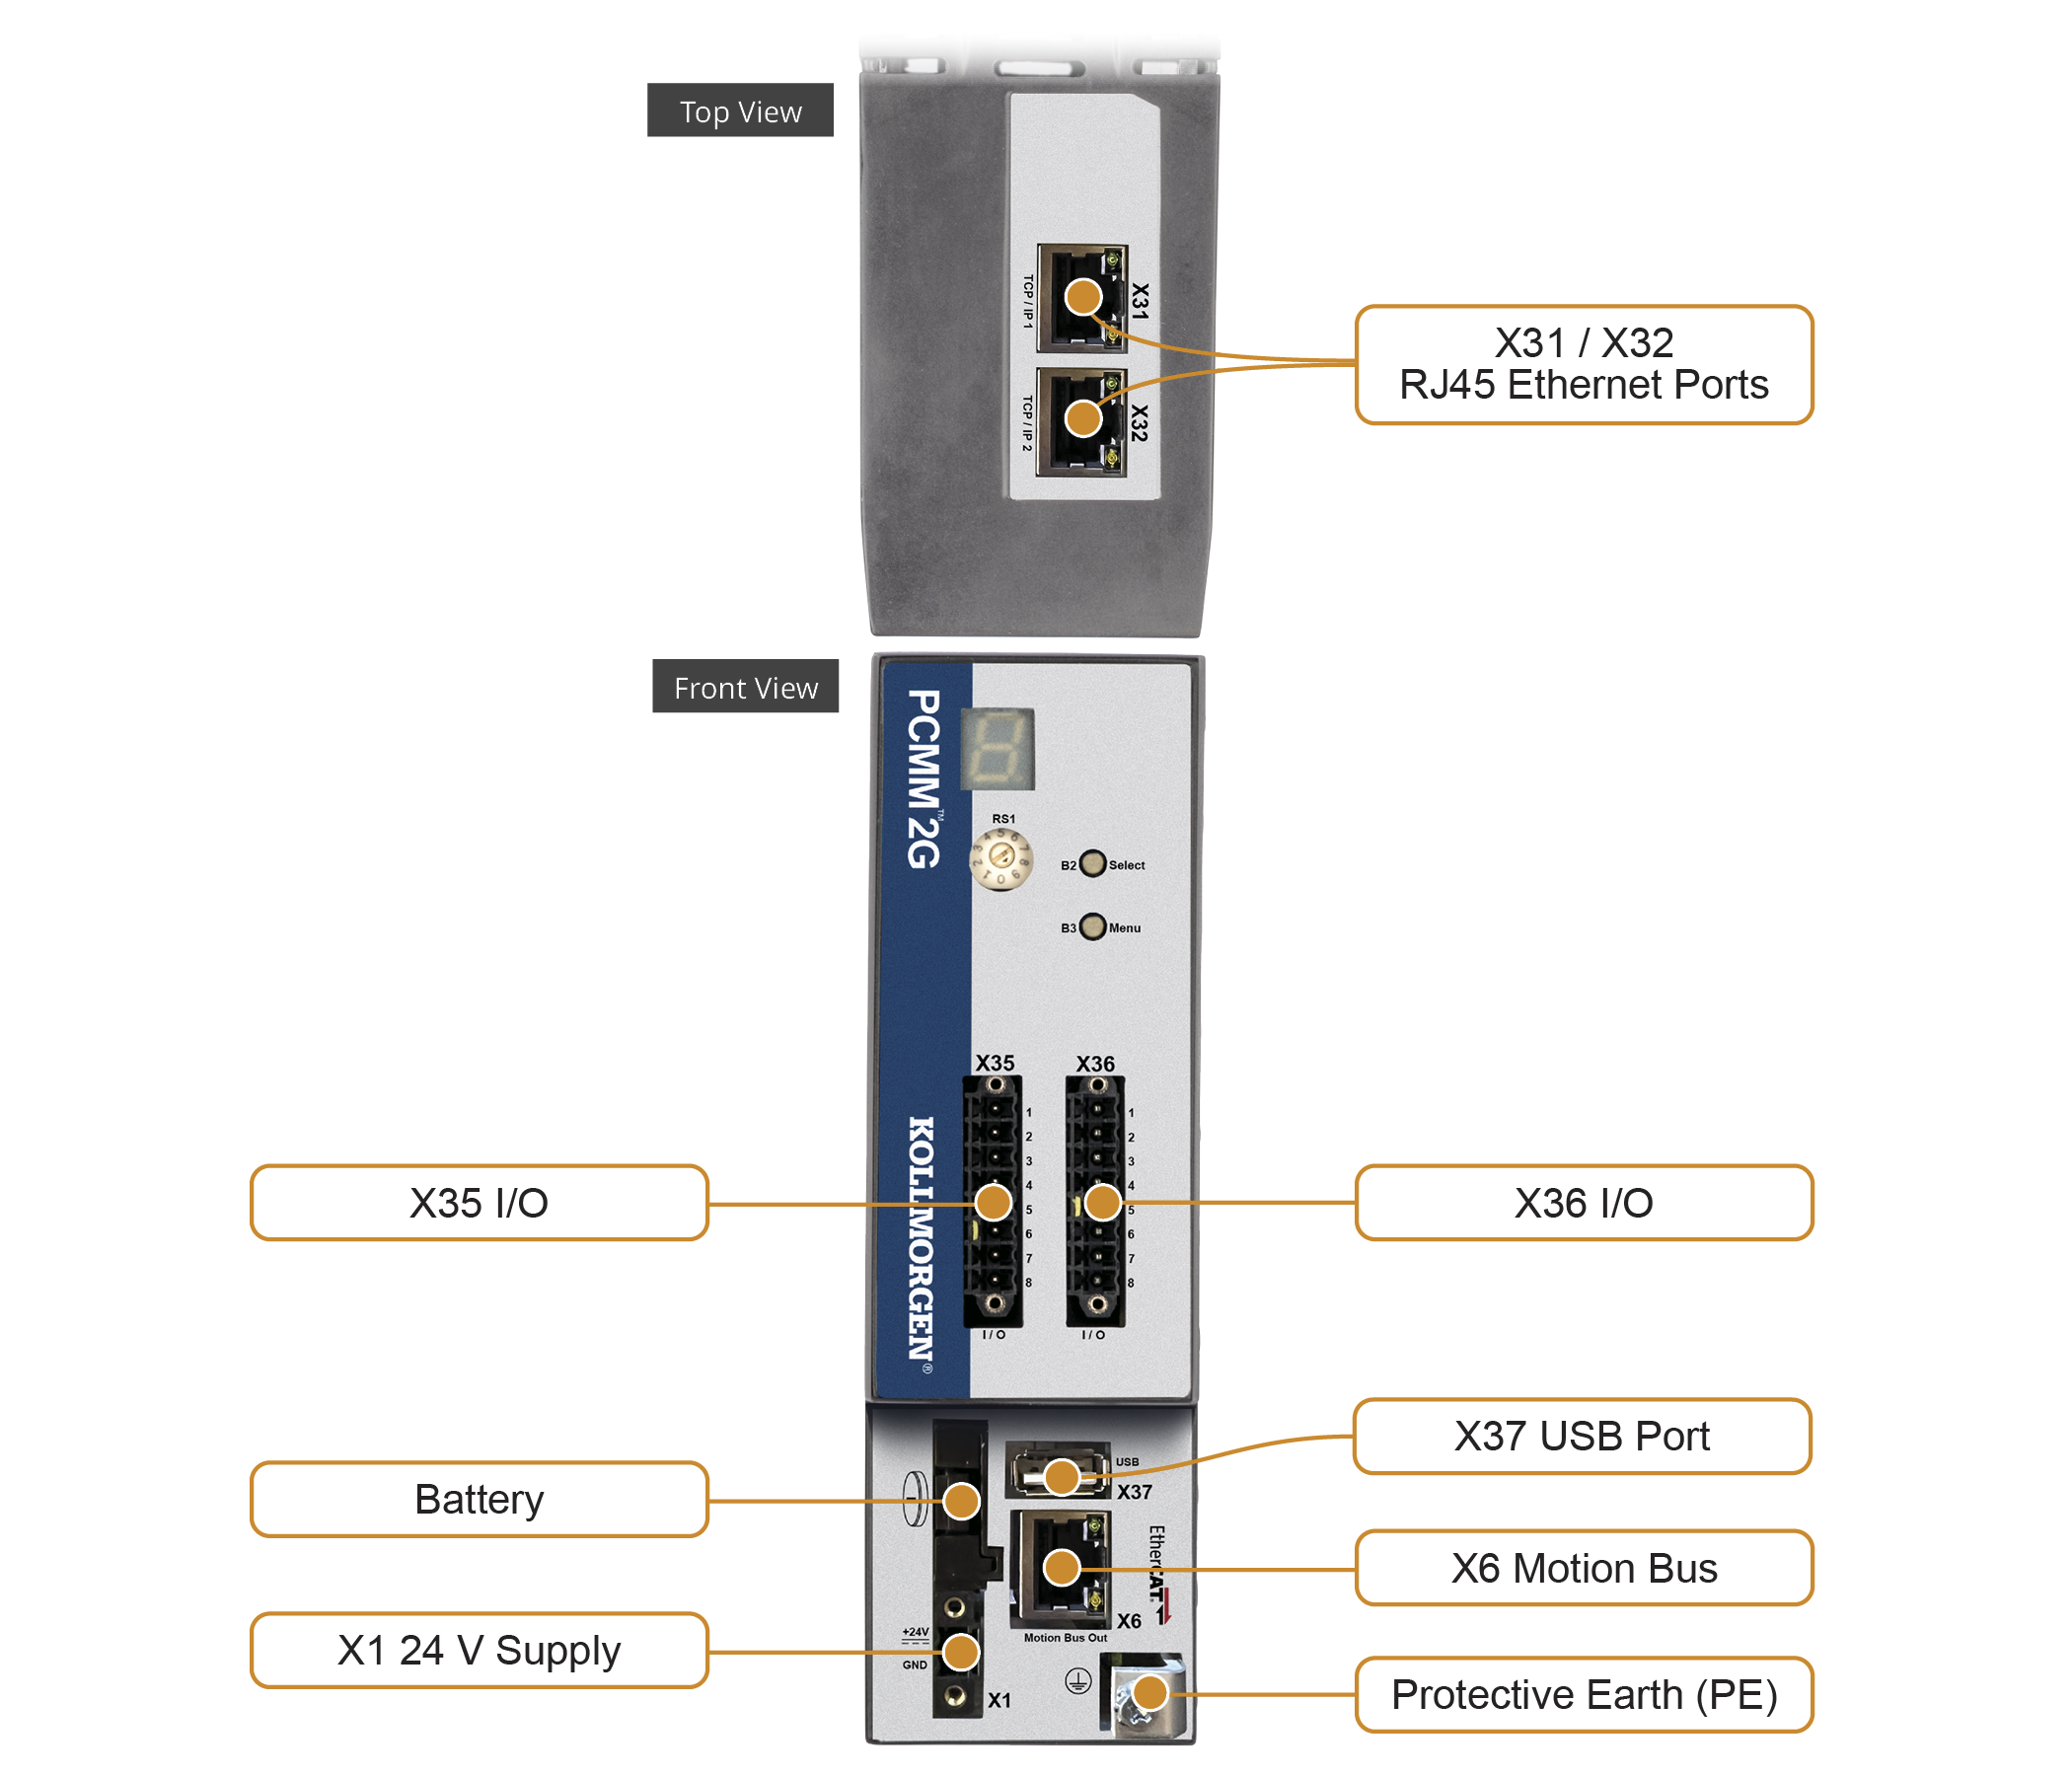
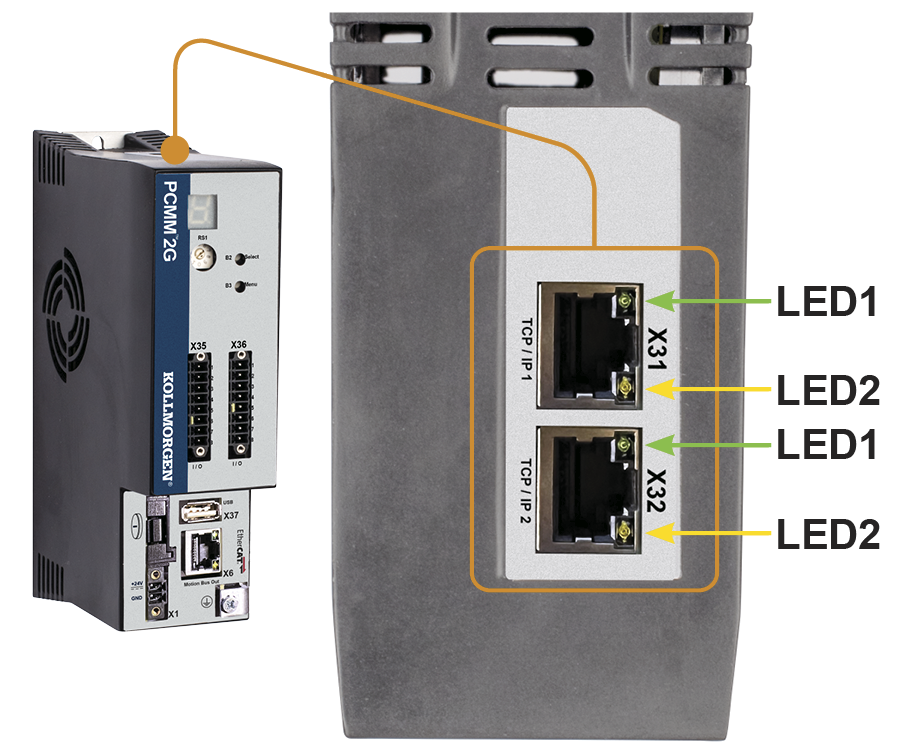
Figure 4-117: PCMM2G Hardware Connections
- Verify the PCMM2G is turned off.
- PCMM2G-specific settings:
- Connect the service interface (X31 or X32) of the PCMM2G to an Ethernet Ethernet is a large, diverse family of frame-based computer networking technologies that operate at many speeds for local area networks (LANs) interface on the PC directly or use a
network hub/switch.
Use standard Cat. 5e / Cat. 6 Ethernet cables for connection. - Insert the USB "Universal Serial Bus"
USB is a serial bus standard to interface devices flash drive into X37.
- Connect the service interface (X31 or X32) of the PCMM2G to an Ethernet
- Hardware settings similar to the PxMM:
- Set the Rotary Switch RS1 to the applicable position.
- Move these cables from the PxMM to the PCMM2G:
- X35 and X36 I/O port.
- X6 EtherCAT ***EtherCAT is an open, high-performance Ethernet-based fieldbus system. The development goal of EtherCAT was to apply Ethernet to automation applications which require short data update times (also called cycle times) with low communication jitter (for synchronization purposes) and low hardware costs Motion Bus port.
- Attach a 24VDC power supply connection to X1 to power on the PCMM2G.
The PCMM2G Boot Sequence starts.
- Confirm the X31 or X32 LED1 on the PCMM2G are green.
- Continue with PCMM2G Configuration.
PCMM2G Configuration
- Identify the PCMM2G's IP address.
See View the Controller IP Address for more information. - Open a web browser and enter the controller's IP address.
The PCMM2G's Web server opens. - Click the LOGIN link at the top of the window.
- Enter the password to log in.
The factory default password isadministrator.
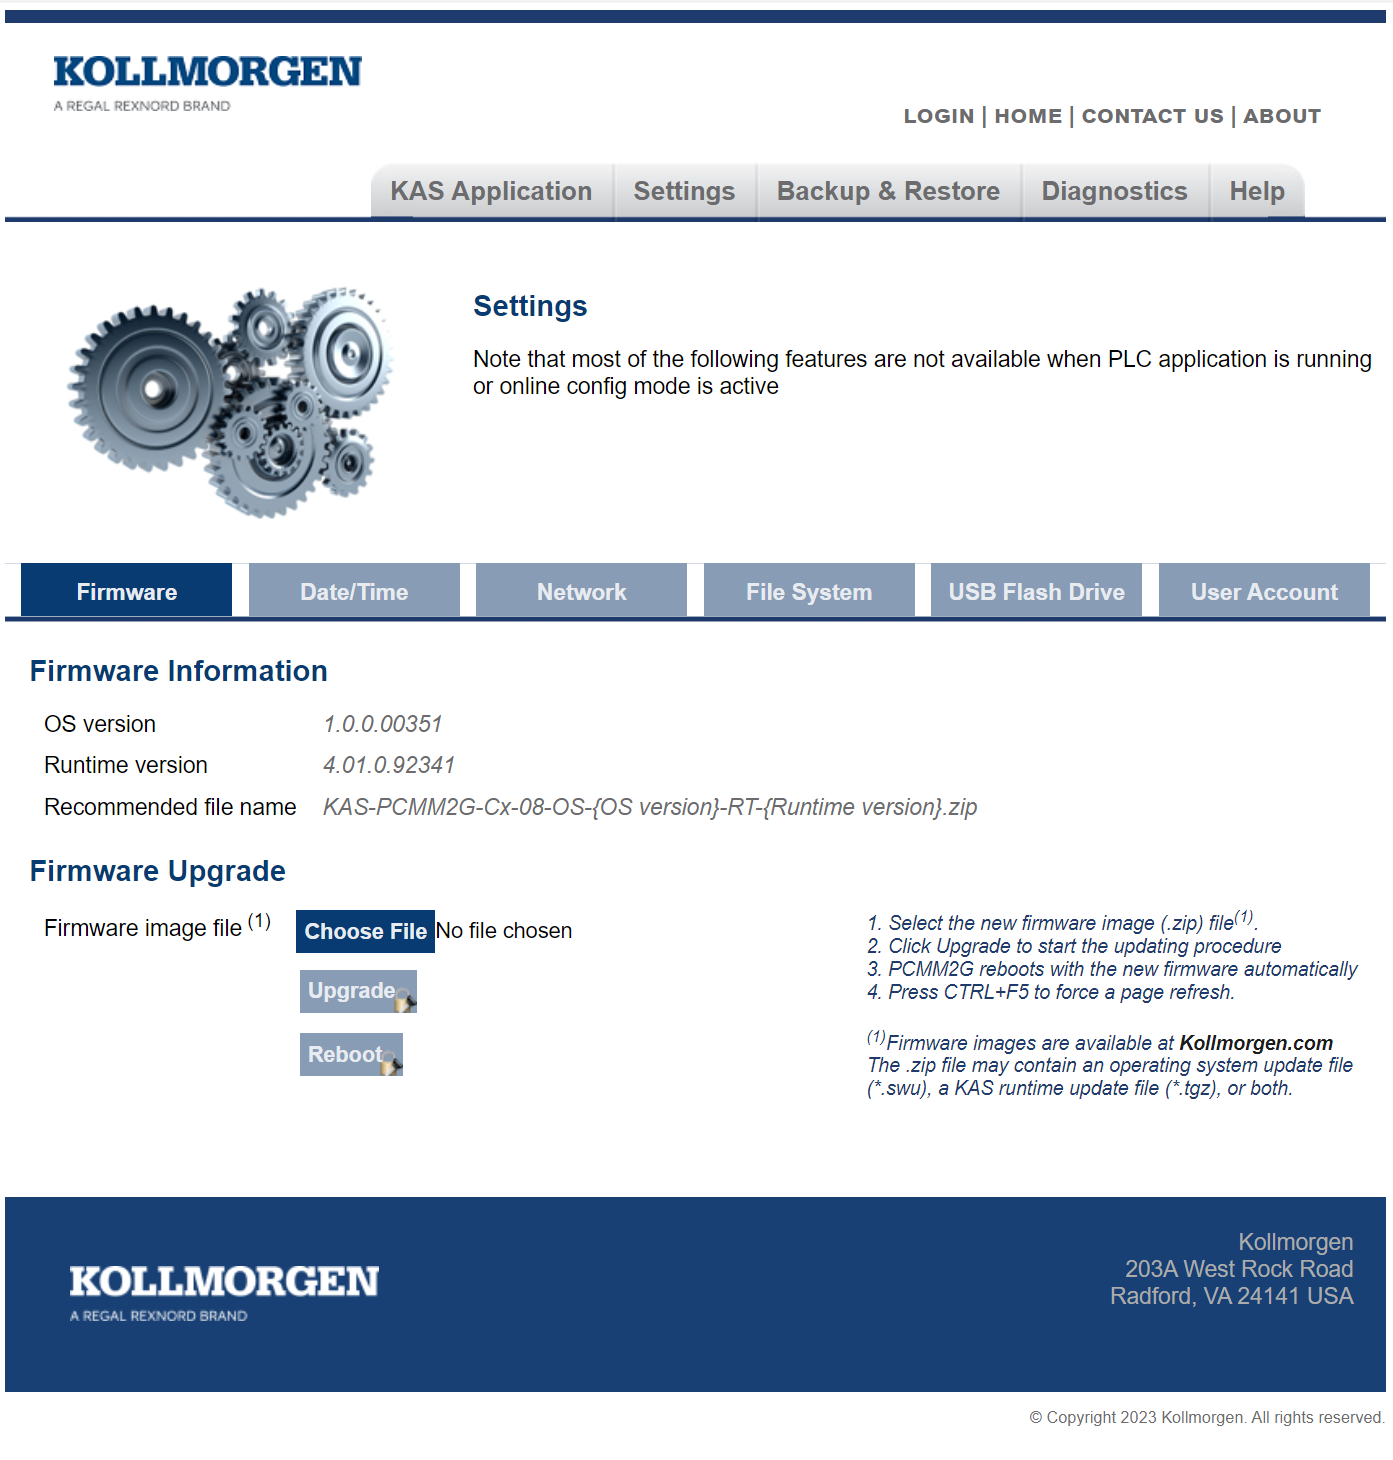
This can be changed after logging in. - Click the Settings tab.
- On the Firmware tab, complete the Upgrade the Controller's Firmware procedure.
- On the Date/Time tab, edit the date, time, and time zone.
- By default, the NTP "Network Time Protocol"
A networking protocol for clock synchronization between computer systems.
The PCMM2G can be configured to synchronize with public NTP time servers over the internet or a local NTP time server for networks that are not connected to the internet. Server is selected for the Date/Time.
- The Date/Time can be manually changed using the Update Date/Time procedure.
- A Time Zone must be assigned to the PCMM2G.
- If the PCMM2G Rotary Switch RS1 is set to 1, use the Network tab to manually define the IP address.
- Continue with User .KAS Project Migration.
Notes about the Date/Time tab
User .KAS Project Migration
- In the KAS-IDE, click File > Open to search for and open the .KAS project saved in the Prepare the User .KAS Project for Migration procedure.
- In the Project View panel, right-click Controller and click Properties.
The Controller Properties dialog opens. - Configure the PCMM2G:
- In the IP address drop-down, enter the PCMM2G IP address.
- In the Controller Type area, select the PCMM2G option button.
- Click OK to save the changes or selections and close the dialog.
- If using the SD card in the PCMM .KAS project:
- Locate and change the file management functions using the SD card file paths to use the USB flash drive file paths.
See File Management, SD Card Path Conventions, and USB Flash Drive Path Conventions. - On a PxMM1G, the user data is stored in either the SD card, internal flash, or a shared directory.
On a PCMM2G, the user data is stored in either the USB flash drive, internal flash, or shared directory. - This example code chooses the SD Card or USB Flash drive file path depending on the controller model.
Click to view example code to keep a .KAS project compatible between PxMM1G and PCMM2G// Get the controller model details once at application startup g_ControllerFamily := CTRLINFO_MODEL_FAMILY_PxMM; Inst_GetCtrlInfo( TRUE, CTRLINFO_MODEL_FAMILY ); IF Inst_GetCtrlInfo.Done THEN g_ControllerFamily := any_to_int(Inst_GetCtrlInfo.Value); END_IF; Inst_GetCtrlInfo( FALSE, CTRLINFO_MODEL_FAMILY ); // Set the file path prefix based on the controller model (SD Card or USB Flash Drive) CASE g_ControllerFamily OF CTRLINFO_MODEL_FAMILY_PCMM2G: UserFilesPathPrefix := '//usbflash/’; CTRLINFO_MODEL_FAMILY_PxMM: UserFilesPathPrefix := '//SDCard/'; END_CASE; // File management operations TestFile := UserFilesPathPrefix + 'test_file.txt'; Inst_FileOpenW( TRUE, TestFile); IF Inst_FileOpenW.Done THEN dataFileID := Inst_FileOpenW.ID; Inst_FileOpenW( FALSE, TestFile ); END_IF;
- Locate and change the file management functions using the SD card file paths to use the USB flash drive file paths.
- Compile and download the .KAS project to the PCMM2G.
- Run the Project and verify it is working as expected.
- Save the .KAS project.
Optional: Click File > Save As to save the .KAS project with a different name. - Use the Web server to complete the PCMM2G Controller and EtherCAT Devices Backup procedure.


